

- Create customer wallets.
- Link wallets to customer identities.
- Support deposits and withdrawals from wallets.
- Create purpose-specific wallets (e.g. card balances).
- Enable transfers between wallets.
Designing your map
Before writing code, it’s crucial to design a money movement map that outlines how money moves in your system. This serves as the blueprint for your implementation. For our wallet management system, here’s how funds will flow: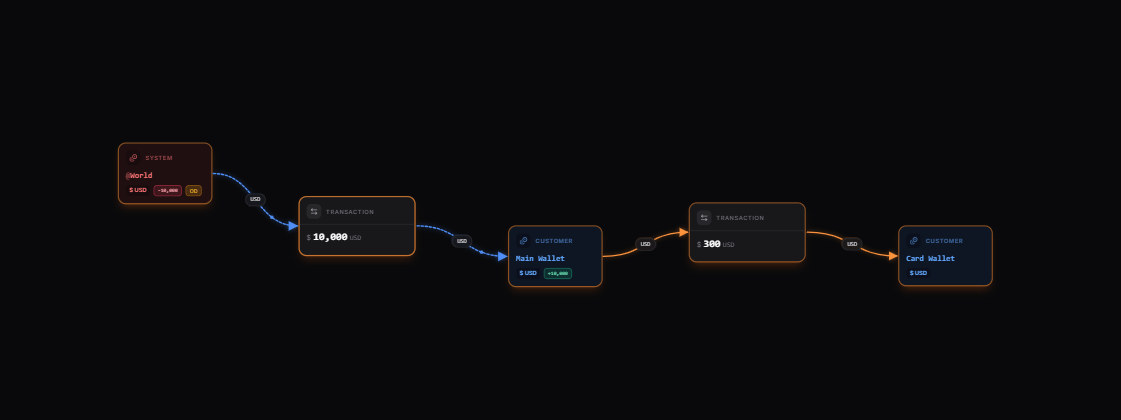
@World: Represents external funding sources and withdrawal destinations.Main Wallet: The customer’s primary wallet for deposits and withdrawals.Card Wallet: A second wallet for card-related transactions.
- Customers can deposit money from external sources to their main wallet.
- Customers can withdraw money from their main wallet to external destinations.
- Customers can transfer money from their main wallet to their card wallet.
Set up your implementation
Based on our map, we’ll implement the following steps:- Create a customer ledger to organise all customer wallets.
- Create customer identity for storing user information.
- Create a main wallet and link it to the identity.
- Implement deposit functionality.
- Implement withdrawal functionality.
- Create a card wallet and link it to the same identity.
- Fund the card wallet from the main wallet.
Prerequisites
Before starting, ensure you have:- A running Blnk Core instance (e.g. at
http://localhost:5001). - An API key for Blnk (replace
YOUR_API_KEYin the code examples). Required for authenticated requests. - Optionally, you can connect your Blnk Core to your Blnk Cloud workspace to view your ledger data.
Create customer ledger
Create a ledger to organize all customer wallets - main and card wallets:Create customer identity
Create a customer identity to store user profile information:Create main wallet
Create a balance to represent the customer main wallet and link to the customer identity:Funding the main wallet
Use an internal balance to represent external deposit sources-such as bank accounts, cards, and other funding methods-responsible for funding a customer’s wallet. Record a deposit from an external source to fund the main wallet:Setting
allow_overdraft to true enables the transaction to proceed even if the source balance lacks sufficient funds.