> ## Documentation Index
> Fetch the complete documentation index at: https://docs.blnkfinance.com/llms.txt
> Use this file to discover all available pages before exploring further.
# Building an AI Billing System
> Learn how to implement usage-based billing for AI products with token tracking, cost calculation, and prepaid/postpaid payment models.
export const CtaCallout = props => {
const {title, buttonLabel, href, trackingEvent, buttonTarget, rel = "noopener noreferrer", children} = props;
const handleCtaClick = () => {
if (typeof window === "undefined" || !trackingEvent) {
return;
}
try {
window.dispatchEvent(new CustomEvent("blnk:docs-cta", {
detail: {
name: trackingEvent,
href
}
}));
} catch {}
try {
window.posthog?.capture?.(trackingEvent, {
href
});
} catch {}
const gaPayload = {
cta_href: href
};
try {
window.gtag?.("event", trackingEvent, gaPayload);
} catch {}
try {
window.dataLayer = window.dataLayer || [];
window.dataLayer.push({
event: trackingEvent,
...gaPayload
});
} catch {}
};
const isExternal = typeof href === "string" && (/^https?:\/\//i).test(href);
const target = buttonTarget ?? (isExternal ? "_blank" : undefined);
const linkRel = isExternal ? rel : undefined;
return ;
};
This tutorial provides a step-by-step guide to building an AI billing system using Blnk Finance. You'll learn how to track token usage, calculate costs, and manage both prepaid and postpaid billing models.
***
## How AI billing works
Each usage event has two components that must be tracked together:
* **Tokens**: The amount consumed, typically measured and reported by your AI provider
* **Dollars**: The monetary value of that consumption based on your pricing model
When a customer uses your AI product, the following happens:
1. **Usage tracking**: The AI provider reports token consumption (input and output tokens)
2. **Cost calculation**: The token count is converted to USD based on your pricing model
3. **Atomic recording**: Both tokens and dollars are recorded together in a single transaction
4. **Balance management**: For prepaid, funds are deducted from the customer wallet. For postpaid, balances move into overdraft
5. **Invoice generation**: At the end of the billing period, generate invoices from accumulated usage
***
## Prerequisites
Before starting, ensure you have:
1. A running Blnk Core instance (e.g. at `http://localhost:5001`).
2. [An API key](/advanced/secure-blnk) for Blnk (replace `YOUR_API_KEY` in the code examples). Required for authenticated requests.
3. Optionally, you can connect your Blnk Core to your [Blnk Cloud](https://cloud.blnkfinance.com/?utm_source=blnk_docs\&utm_medium=documentation\&utm_campaign=tutorials%2Fmore%2Fai-billing) workspace to view your ledger data.
***
## 1: Create customer wallet
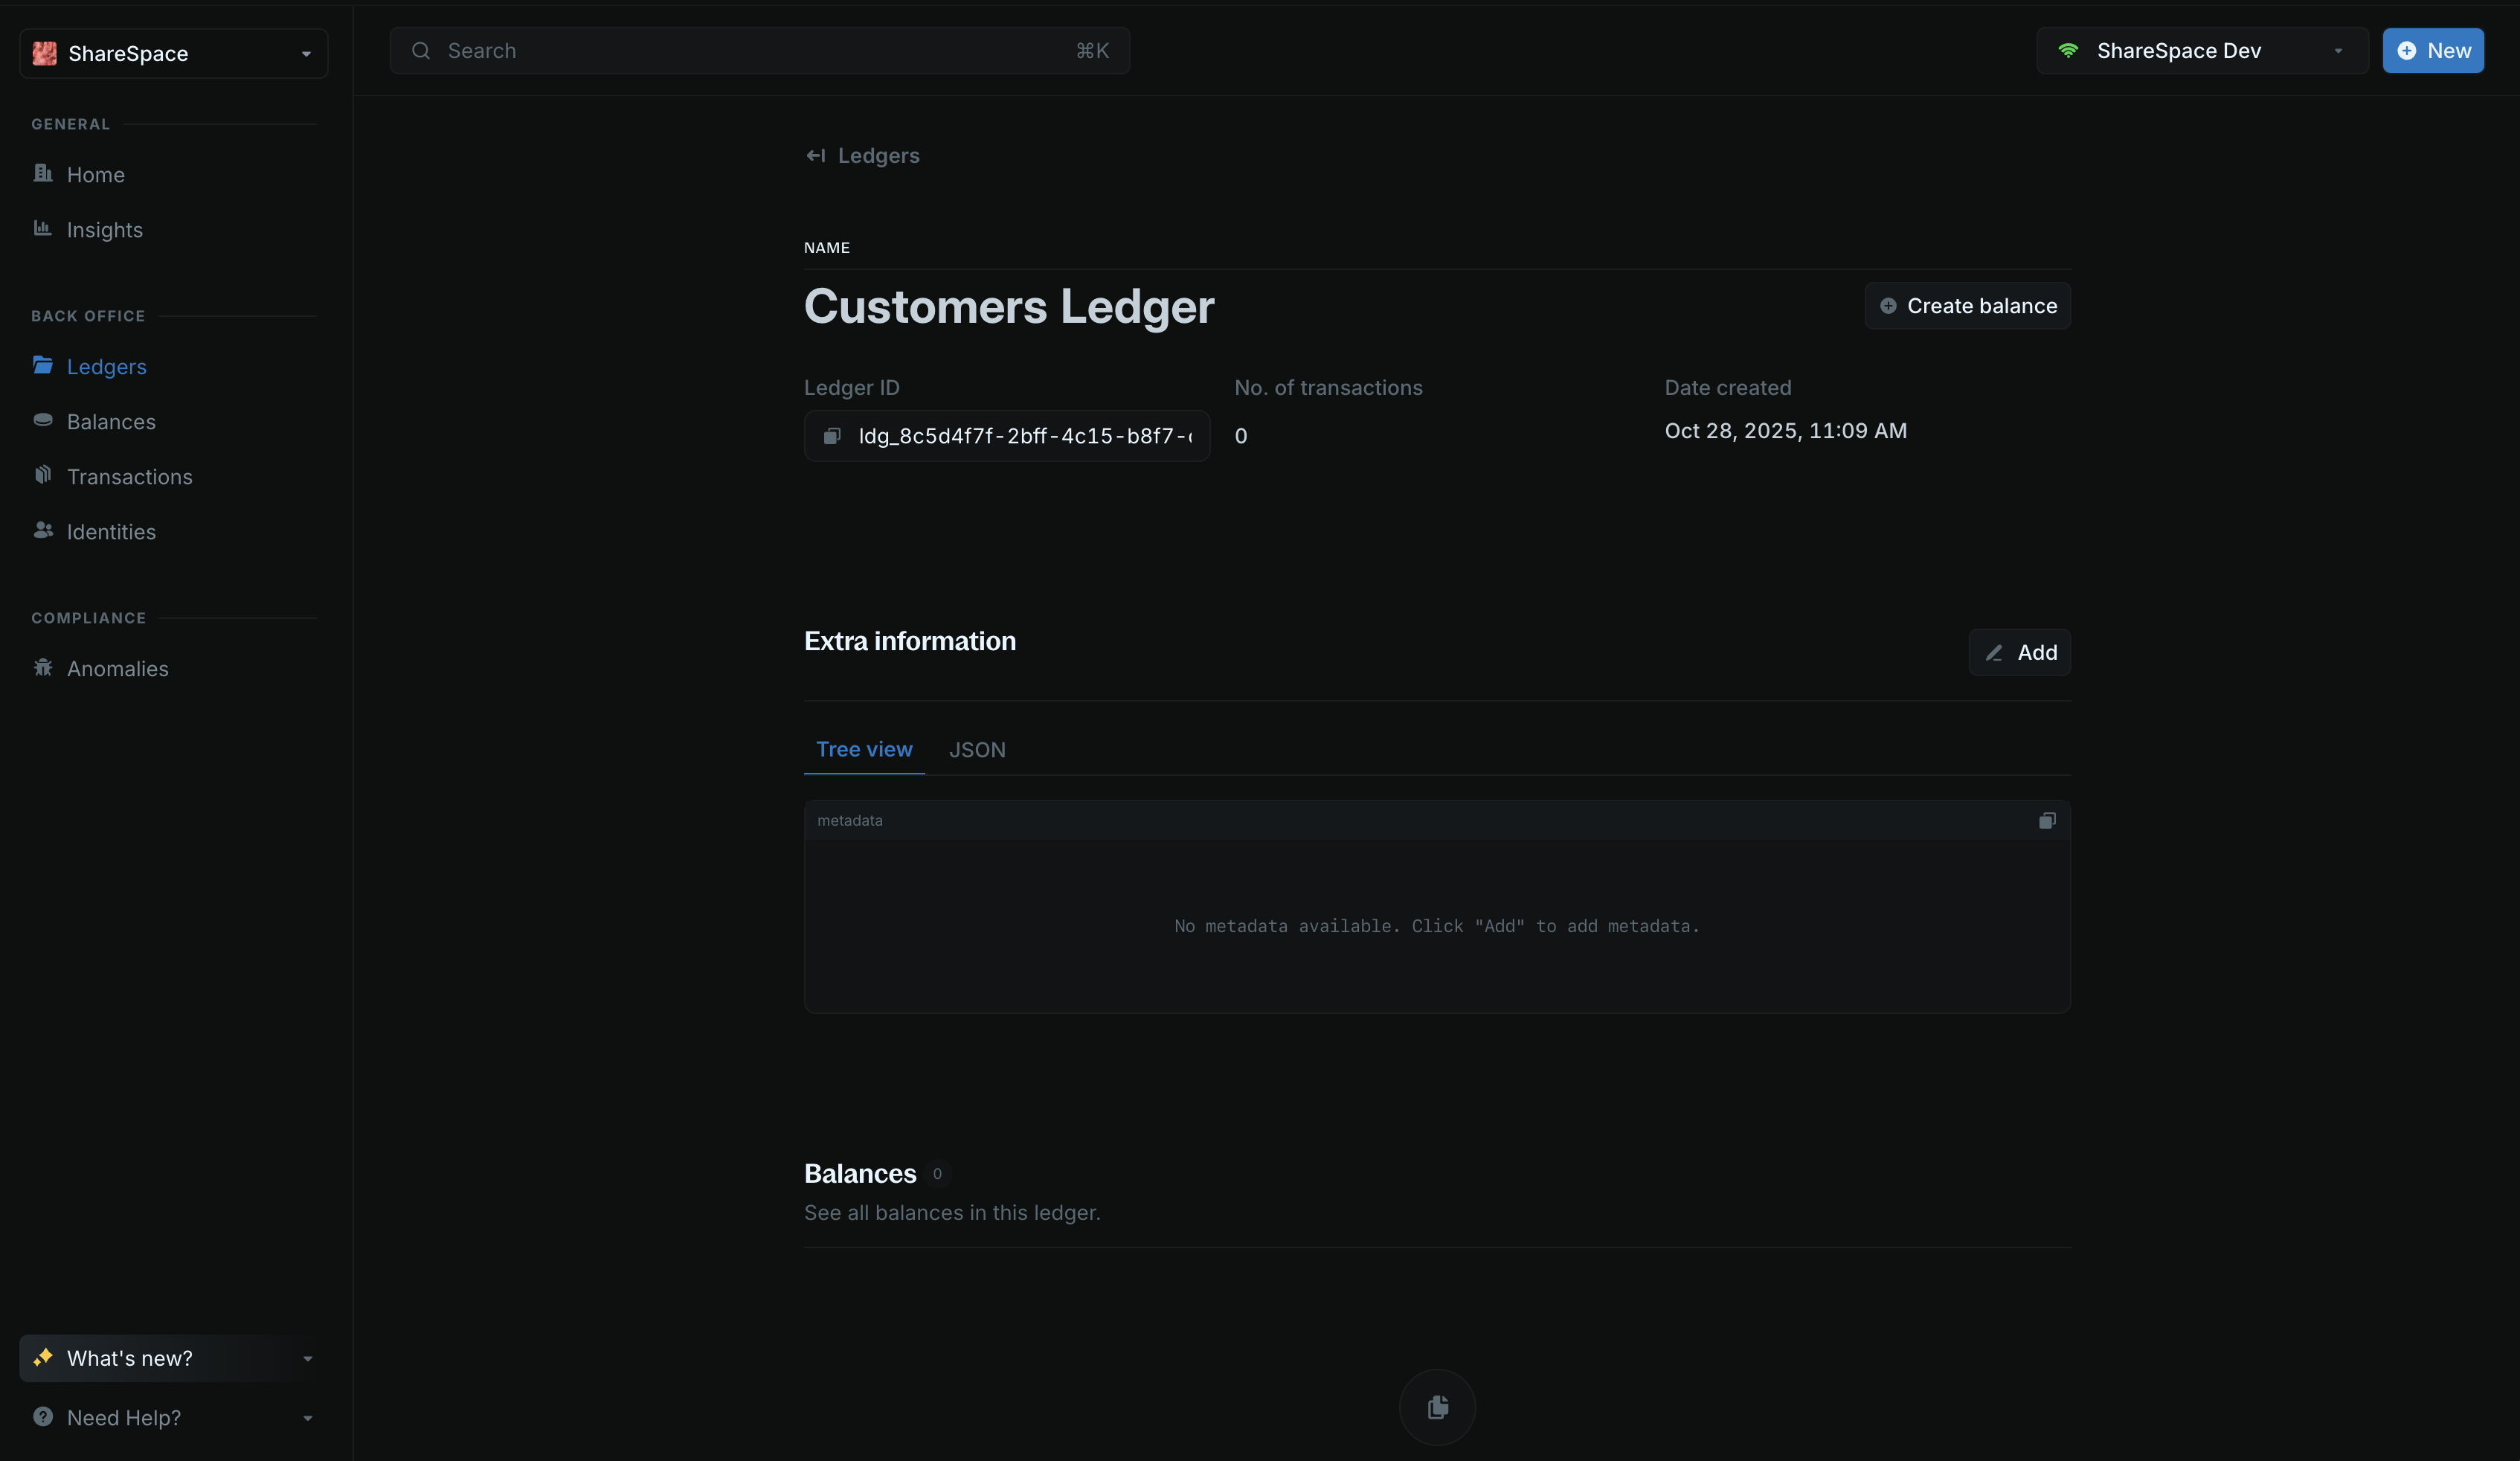
Each customer needs a wallet to track their usage and balance. Each wallet will be represented with [a ledger](/ledgers/introduction.mdx) and a balance.
[Create a ledger](/reference/create-ledger) for customer wallets. This groups all customer balances in one place:
```bash cURL wrap theme={"system"}
curl -X POST "http://localhost:5001/ledgers" \
-H "X-Blnk-Key: " \
-H "Content-Type: application/json" \
-d '{
"name": "Customers Ledger"
}'
```
```typescript TypeScript wrap theme={"system"}
const response = await blnk.Ledgers.create({
name: 'Customers Ledger',
});
```
```go Go wrap theme={"system"}
ledger, resp, err := client.Ledger.Create(blnkgo.CreateLedgerRequest{
Name: "Customers Ledger",
})
```
```bash Blnk CLI wrap theme={"system"}
blnk ledgers create
```
Save the `ledger_id` from the response. You'll need it to create balances for customer wallets.
 [Create a customer identity](/reference/create-identity) to link all balances to the same customer:
```bash cURL wrap theme={"system"}
curl -X POST "http://localhost:5001/identities" \
-H "X-Blnk-Key: " \
-H "Content-Type: application/json" \
-d '{
"first_name": "Xavier",
"last_name": "Woods"
}'
```
```typescript TypeScript wrap theme={"system"}
const response = await blnk.Identity.create({
first_name: 'Xavier',
last_name: 'Woods',
});
```
```go Go wrap theme={"system"}
identity, resp, err := client.Identity.Create(blnkgo.Identity{
FirstName: "Xavier",
LastName: "Woods",
})
```
```bash Blnk CLI wrap theme={"system"}
blnk identities create
```
Save the `identity_id` from the response. You'll use this ID to link the customer wallet to this identity.
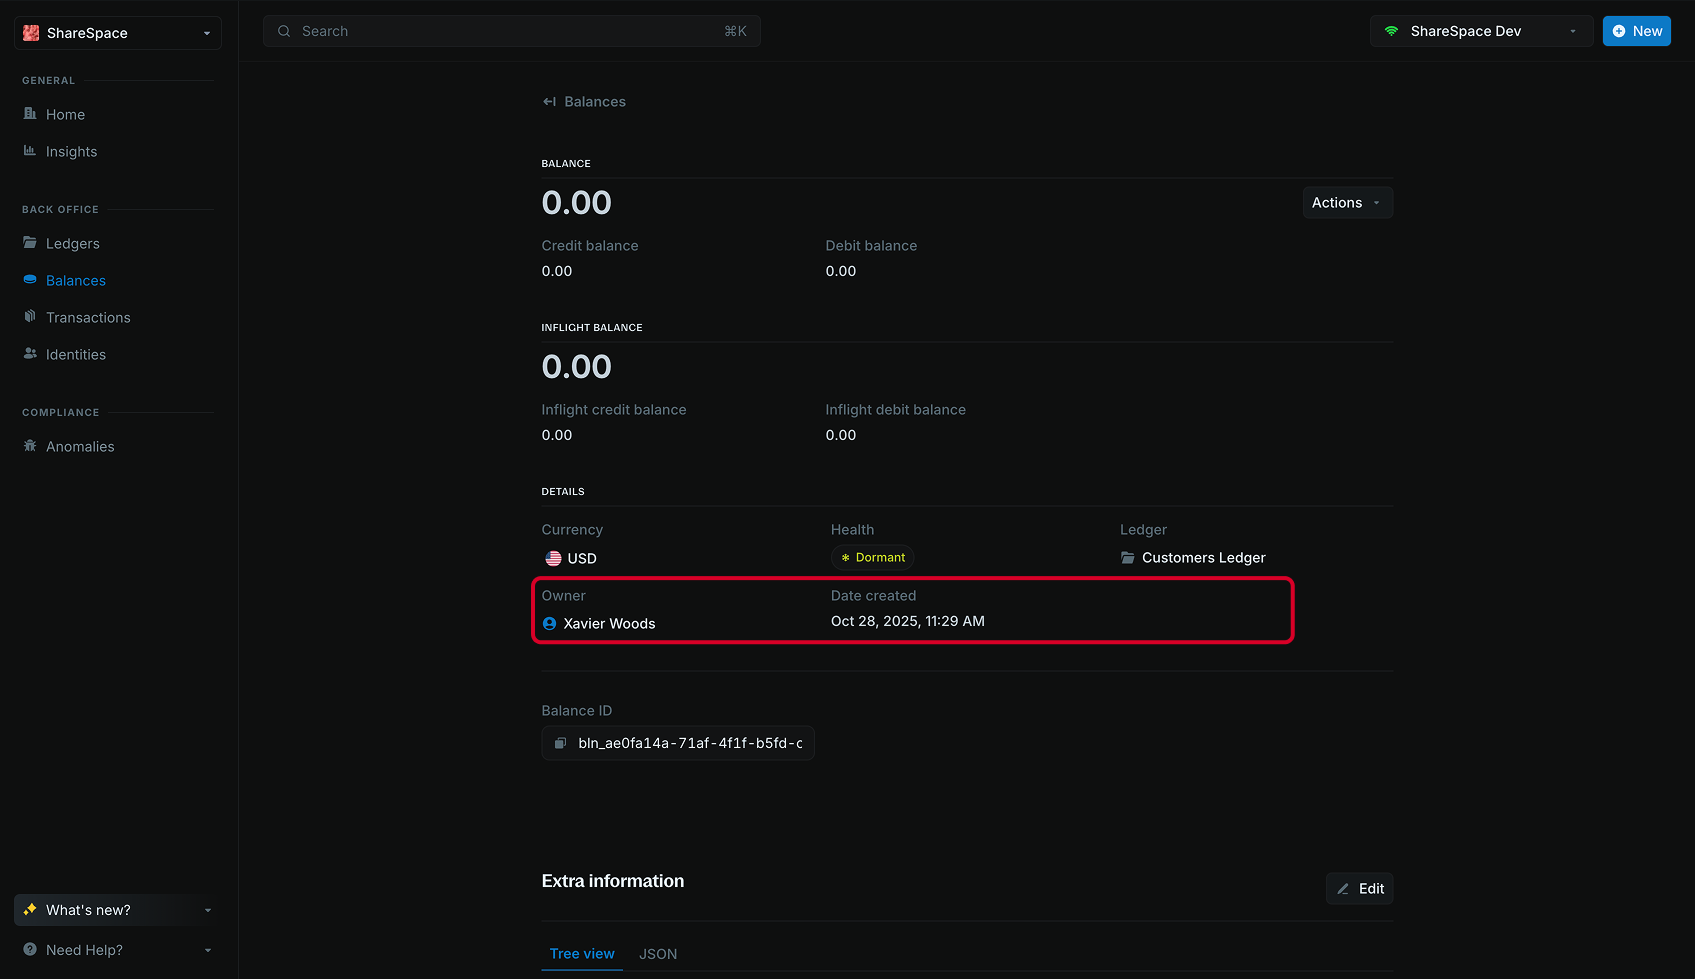
[Create a balance](/reference/create-balance) for the customer wallet:
```bash cURL wrap theme={"system"}
curl -X POST "http://localhost:5001/balances" \
-H "X-Blnk-Key: " \
-H "Content-Type: application/json" \
-d '{
"ledger_id": "",
"identity_id": "",
"currency": "USD",
"meta_data": { "name": "Xavier Woods" }
}'
```
```typescript TypeScript wrap theme={"system"}
const response = await blnk.LedgerBalances.create({
ledger_id: '',
identity_id: '',
currency: 'USD',
meta_data: { name: 'Xavier Woods' },
});
```
```go Go wrap theme={"system"}
balance, resp, err := client.LedgerBalance.Create(blnkgo.CreateLedgerBalanceRequest{
LedgerID: "",
IdentityID: "",
Currency: "USD",
MetaData: map[string]interface{}{
"name": "Xavier Woods",
},
})
```
```bash Blnk CLI wrap theme={"system"}
blnk balances create
```
Save the `balance_id` from the response. You'll need it for wallet funding and usage transactions.
[Create a customer identity](/reference/create-identity) to link all balances to the same customer:
```bash cURL wrap theme={"system"}
curl -X POST "http://localhost:5001/identities" \
-H "X-Blnk-Key: " \
-H "Content-Type: application/json" \
-d '{
"first_name": "Xavier",
"last_name": "Woods"
}'
```
```typescript TypeScript wrap theme={"system"}
const response = await blnk.Identity.create({
first_name: 'Xavier',
last_name: 'Woods',
});
```
```go Go wrap theme={"system"}
identity, resp, err := client.Identity.Create(blnkgo.Identity{
FirstName: "Xavier",
LastName: "Woods",
})
```
```bash Blnk CLI wrap theme={"system"}
blnk identities create
```
Save the `identity_id` from the response. You'll use this ID to link the customer wallet to this identity.
[Create a balance](/reference/create-balance) for the customer wallet:
```bash cURL wrap theme={"system"}
curl -X POST "http://localhost:5001/balances" \
-H "X-Blnk-Key: " \
-H "Content-Type: application/json" \
-d '{
"ledger_id": "",
"identity_id": "",
"currency": "USD",
"meta_data": { "name": "Xavier Woods" }
}'
```
```typescript TypeScript wrap theme={"system"}
const response = await blnk.LedgerBalances.create({
ledger_id: '',
identity_id: '',
currency: 'USD',
meta_data: { name: 'Xavier Woods' },
});
```
```go Go wrap theme={"system"}
balance, resp, err := client.LedgerBalance.Create(blnkgo.CreateLedgerBalanceRequest{
LedgerID: "",
IdentityID: "",
Currency: "USD",
MetaData: map[string]interface{}{
"name": "Xavier Woods",
},
})
```
```bash Blnk CLI wrap theme={"system"}
blnk balances create
```
Save the `balance_id` from the response. You'll need it for wallet funding and usage transactions.
 ***
## 2: Wallet top-up
Customers can fund their wallets before using your AI product. This is required for prepaid billing models.
When a customer funds their wallet, money moves from the external world to the customer's wallet:
***
## 2: Wallet top-up
Customers can fund their wallets before using your AI product. This is required for prepaid billing models.
When a customer funds their wallet, money moves from the external world to the customer's wallet:
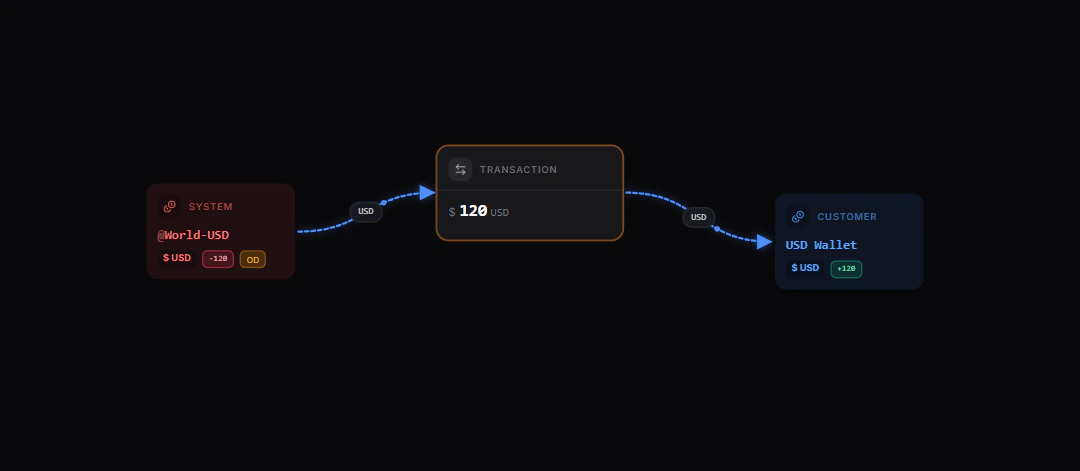 [Explore the map yourself here](https://map.blnkfinance.xyz/HAeq2mnPxI)
`@World-USD` is an [internal balance](/balances/internal-balances) that represents money entering and leaving your system. Internal balances use the `@` prefix and don't require a balance ID.
[Create a transaction](/reference/create-transaction) to add funds to the customer's wallet:
```bash cURL wrap theme={"system"}
curl -X POST "http://localhost:5001/transactions" \
-H "X-Blnk-Key: " \
-H "Content-Type: application/json" \
-d '{
"precise_amount": 12000,
"precision": 100,
"currency": "USD",
"reference": "ai-billing_ref-001",
"source": "@World-USD",
"destination": "",
"description": "Wallet funding",
"allow_overdraft": true
}'
```
```typescript TypeScript wrap theme={"system"}
const response = await blnk.Transactions.create({
precise_amount: 12000,
precision: 100,
currency: 'USD',
reference: 'ai-billing_ref-001',
source: '@World-USD',
destination: '',
description: 'Wallet funding',
allow_overdraft: true,
});
```
```go Go wrap theme={"system"}
transaction, resp, err := client.Transaction.Create(blnkgo.CreateTransactionRequest{
ParentTransaction: blnkgo.ParentTransaction{
PreciseAmount: 12000,
Precision: 100,
Currency: "USD",
Reference: "ai-billing_ref-001",
Source: "@World-USD",
Destination: "",
Description: "Wallet funding",
},
AllowOverdraft: true,
})
```
```bash Blnk CLI wrap theme={"system"}
blnk transactions create
```
[Explore the map yourself here](https://map.blnkfinance.xyz/HAeq2mnPxI)
`@World-USD` is an [internal balance](/balances/internal-balances) that represents money entering and leaving your system. Internal balances use the `@` prefix and don't require a balance ID.
[Create a transaction](/reference/create-transaction) to add funds to the customer's wallet:
```bash cURL wrap theme={"system"}
curl -X POST "http://localhost:5001/transactions" \
-H "X-Blnk-Key: " \
-H "Content-Type: application/json" \
-d '{
"precise_amount": 12000,
"precision": 100,
"currency": "USD",
"reference": "ai-billing_ref-001",
"source": "@World-USD",
"destination": "",
"description": "Wallet funding",
"allow_overdraft": true
}'
```
```typescript TypeScript wrap theme={"system"}
const response = await blnk.Transactions.create({
precise_amount: 12000,
precision: 100,
currency: 'USD',
reference: 'ai-billing_ref-001',
source: '@World-USD',
destination: '',
description: 'Wallet funding',
allow_overdraft: true,
});
```
```go Go wrap theme={"system"}
transaction, resp, err := client.Transaction.Create(blnkgo.CreateTransactionRequest{
ParentTransaction: blnkgo.ParentTransaction{
PreciseAmount: 12000,
Precision: 100,
Currency: "USD",
Reference: "ai-billing_ref-001",
Source: "@World-USD",
Destination: "",
Description: "Wallet funding",
},
AllowOverdraft: true,
})
```
```bash Blnk CLI wrap theme={"system"}
blnk transactions create
```
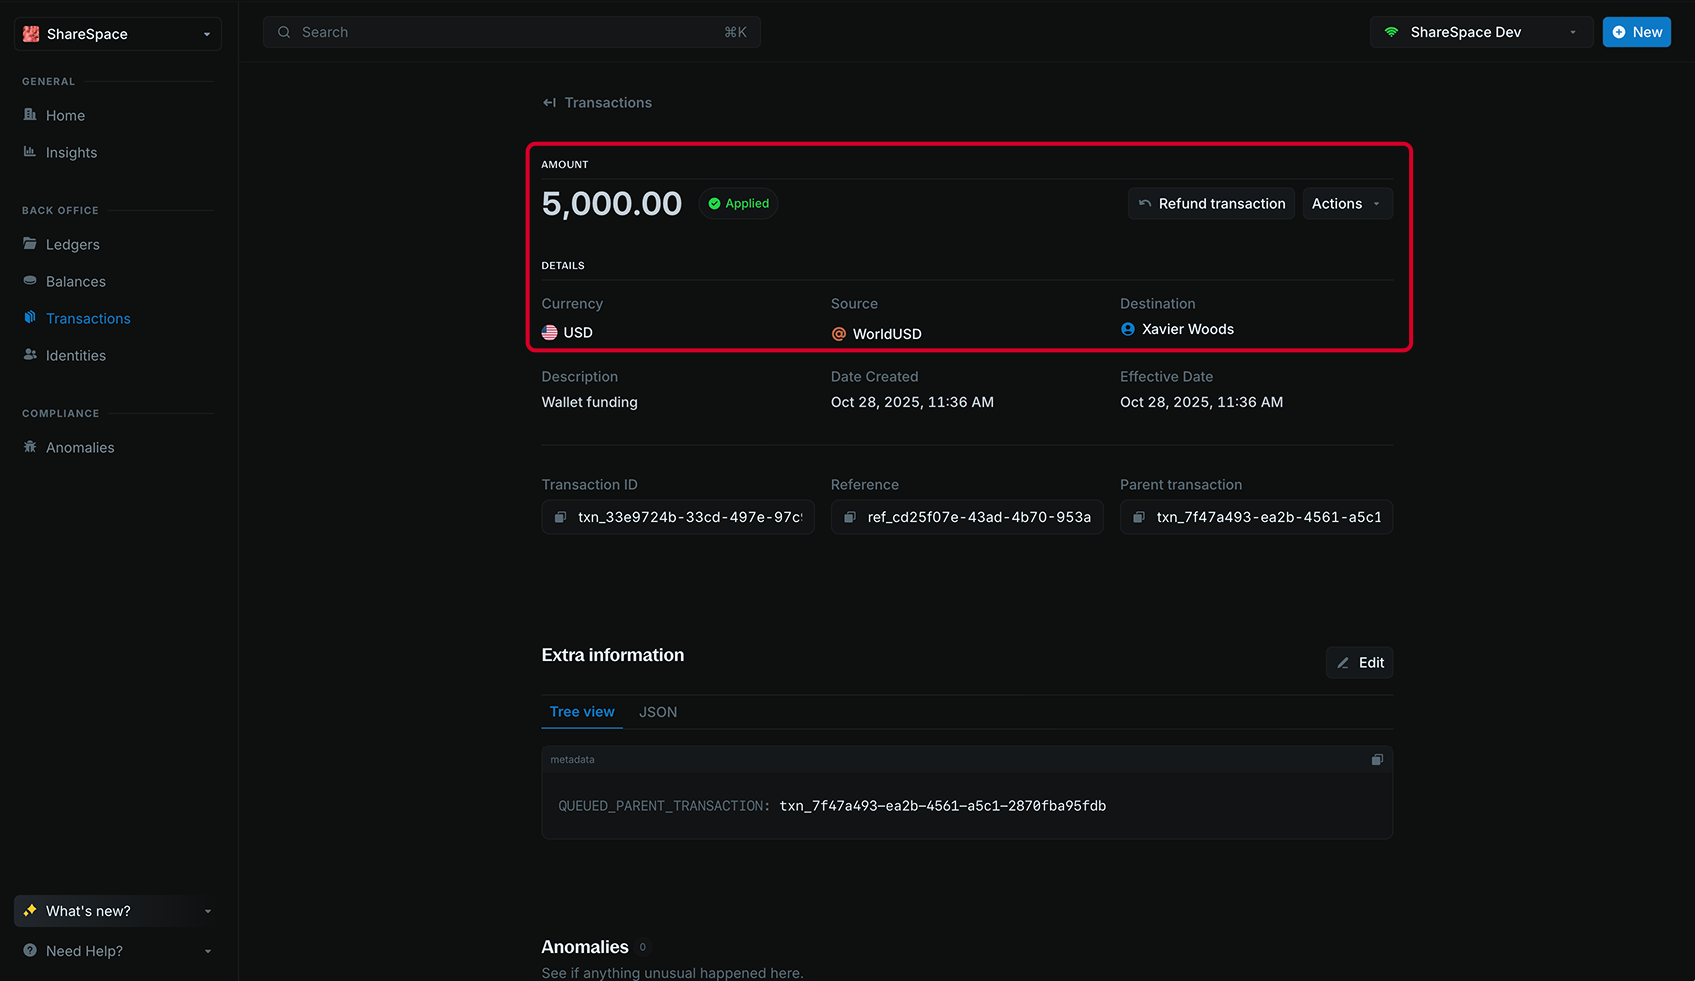 Blnk enforces [double-entry accounting](/guides/double-entry) through the source and destination fields. The source represents where funds are deducted from, while the destination represents where they are credited to.
***
## 3: Track usage and billing
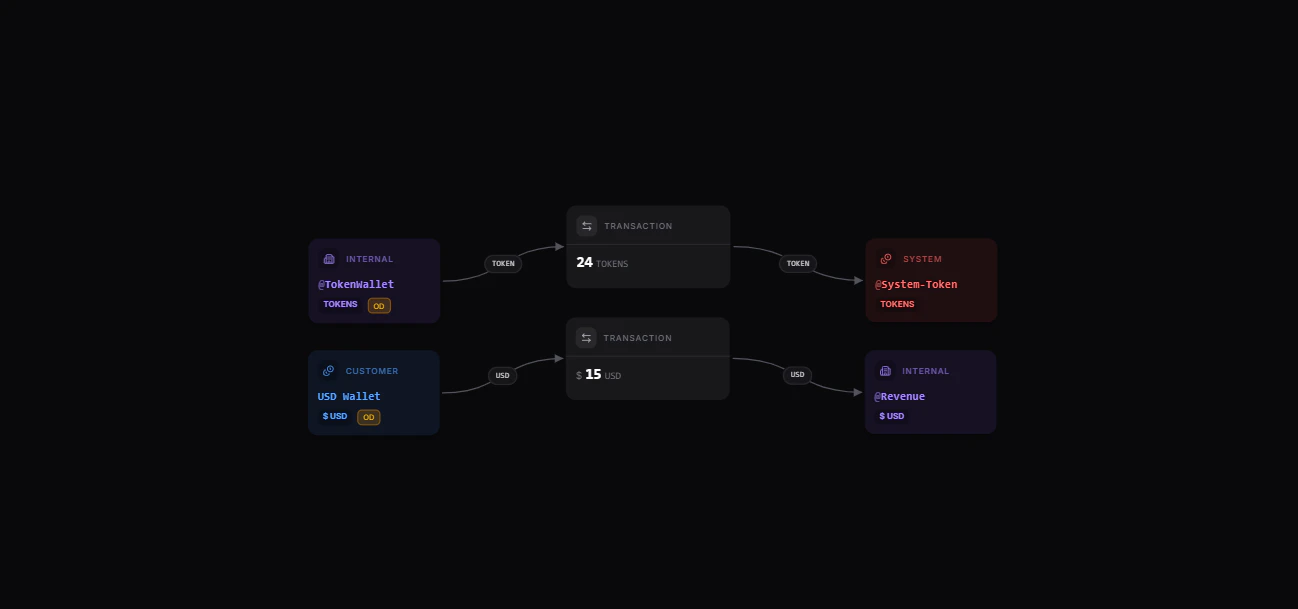
To record usage in your ledger, you need to know **how many tokens** your AI model consumed and **what that usage is worth in USD**. Both components are recorded together atomically.
When a customer uses your AI product, two things happen simultaneously:
Blnk enforces [double-entry accounting](/guides/double-entry) through the source and destination fields. The source represents where funds are deducted from, while the destination represents where they are credited to.
***
## 3: Track usage and billing
To record usage in your ledger, you need to know **how many tokens** your AI model consumed and **what that usage is worth in USD**. Both components are recorded together atomically.
When a customer uses your AI product, two things happen simultaneously:
 [Explore the map yourself here](https://map.blnkfinance.xyz/AO5n3YG0ZV)
* Tokens are moved from the customer's token allocation to your system's token pool
* The corresponding USD value is debited from the customer's wallet and credited to your revenue account
Both actions occur together in a single atomic write, ensuring every token record has a matching customer debit transaction.
Connect to your AI provider. For this example, we'll use the OpenAI TypeScript SDK:
```typescript theme={"system"}
import OpenAI from "openai";
export const openai = new OpenAI({
apiKey: process.env.OPENAI_API_KEY!
});
```
Make a completion request and extract token usage after each event:
```typescript theme={"system"}
export async function runCompletion(model: string, prompt: string) {
const response = await openai.chat.completions.create({
model,
messages: [{ role: "user", content: prompt }],
});
const inputTokens = response.usage?.prompt_tokens ?? 0;
const outputTokens = response.usage?.completion_tokens ?? 0;
return {
inputTokens,
outputTokens,
totalTokens: inputTokens + outputTokens
};
}
```
Each model has its own rate for input and output tokens. Calculate the cost:
```typescript expandable theme={"system"}
const MODEL_RATES = {
"gpt-4o-mini": { inputPer1K: 0.15, outputPer1K: 0.60 },
"gpt-4o": { inputPer1K: 0.30, outputPer1K: 1.20 },
};
export function calculateUSD(
model: string,
inputTokens: number,
outputTokens: number
) {
const rate = MODEL_RATES[model];
if (!rate) throw new Error(`No pricing configured for model: ${model}`);
const inputCost = (inputTokens / 1000) * rate.inputPer1K;
const outputCost = (outputTokens / 1000) * rate.outputPer1K;
return inputCost + outputCost;
}
```
Record both token usage and dollar cost together using the [bulk transactions](/reference/bulk-transactions) endpoint with `atomic: true`:
```bash cURL wrap expandable theme={"system"}
curl -X POST "http://localhost:5001/transactions/bulk" \
-H "X-Blnk-Key: " \
-H "Content-Type: application/json" \
-d '{
"atomic": true,
"run_async": false,
"transactions": [
{
"precise_amount": 2290,
"precision": 1,
"currency": "TOKENS",
"reference": "ref_ai-billing_001_tokens",
"source": "@Token-Wallet",
"destination": "@System-Tokens",
"description": "Token leg",
"allow_overdraft": true
},
{
"precise_amount": 602500,
"precision": 100,
"currency": "USD",
"reference": "ref_ai-billing_001_usd",
"source": "",
"destination": "@Revenue",
"description": "USD leg",
"allow_overdraft": false
}
]
}'
```
```typescript TypeScript wrap expandable theme={"system"}
const response = await blnk.Transactions.createBulk({
atomic: true,
run_async: false,
transactions: [
{
precise_amount: 2290,
precision: 1,
currency: 'TOKENS',
reference: 'ref_ai-billing_001_tokens',
source: '@Token-Wallet',
destination: '@System-Tokens',
description: 'Token leg',
allow_overdraft: true,
},
{
precise_amount: 602500,
precision: 100,
currency: 'USD',
reference: 'ref_ai-billing_001_usd',
source: '',
destination: '@Revenue',
description: 'USD leg',
allow_overdraft: false,
},
],
});
```
```go Go wrap theme={"system"}
```
```bash Blnk CLI wrap theme={"system"}
```
[Explore the map yourself here](https://map.blnkfinance.xyz/AO5n3YG0ZV)
* Tokens are moved from the customer's token allocation to your system's token pool
* The corresponding USD value is debited from the customer's wallet and credited to your revenue account
Both actions occur together in a single atomic write, ensuring every token record has a matching customer debit transaction.
Connect to your AI provider. For this example, we'll use the OpenAI TypeScript SDK:
```typescript theme={"system"}
import OpenAI from "openai";
export const openai = new OpenAI({
apiKey: process.env.OPENAI_API_KEY!
});
```
Make a completion request and extract token usage after each event:
```typescript theme={"system"}
export async function runCompletion(model: string, prompt: string) {
const response = await openai.chat.completions.create({
model,
messages: [{ role: "user", content: prompt }],
});
const inputTokens = response.usage?.prompt_tokens ?? 0;
const outputTokens = response.usage?.completion_tokens ?? 0;
return {
inputTokens,
outputTokens,
totalTokens: inputTokens + outputTokens
};
}
```
Each model has its own rate for input and output tokens. Calculate the cost:
```typescript expandable theme={"system"}
const MODEL_RATES = {
"gpt-4o-mini": { inputPer1K: 0.15, outputPer1K: 0.60 },
"gpt-4o": { inputPer1K: 0.30, outputPer1K: 1.20 },
};
export function calculateUSD(
model: string,
inputTokens: number,
outputTokens: number
) {
const rate = MODEL_RATES[model];
if (!rate) throw new Error(`No pricing configured for model: ${model}`);
const inputCost = (inputTokens / 1000) * rate.inputPer1K;
const outputCost = (outputTokens / 1000) * rate.outputPer1K;
return inputCost + outputCost;
}
```
Record both token usage and dollar cost together using the [bulk transactions](/reference/bulk-transactions) endpoint with `atomic: true`:
```bash cURL wrap expandable theme={"system"}
curl -X POST "http://localhost:5001/transactions/bulk" \
-H "X-Blnk-Key: " \
-H "Content-Type: application/json" \
-d '{
"atomic": true,
"run_async": false,
"transactions": [
{
"precise_amount": 2290,
"precision": 1,
"currency": "TOKENS",
"reference": "ref_ai-billing_001_tokens",
"source": "@Token-Wallet",
"destination": "@System-Tokens",
"description": "Token leg",
"allow_overdraft": true
},
{
"precise_amount": 602500,
"precision": 100,
"currency": "USD",
"reference": "ref_ai-billing_001_usd",
"source": "",
"destination": "@Revenue",
"description": "USD leg",
"allow_overdraft": false
}
]
}'
```
```typescript TypeScript wrap expandable theme={"system"}
const response = await blnk.Transactions.createBulk({
atomic: true,
run_async: false,
transactions: [
{
precise_amount: 2290,
precision: 1,
currency: 'TOKENS',
reference: 'ref_ai-billing_001_tokens',
source: '@Token-Wallet',
destination: '@System-Tokens',
description: 'Token leg',
allow_overdraft: true,
},
{
precise_amount: 602500,
precision: 100,
currency: 'USD',
reference: 'ref_ai-billing_001_usd',
source: '',
destination: '@Revenue',
description: 'USD leg',
allow_overdraft: false,
},
],
});
```
```go Go wrap theme={"system"}
```
```bash Blnk CLI wrap theme={"system"}
```
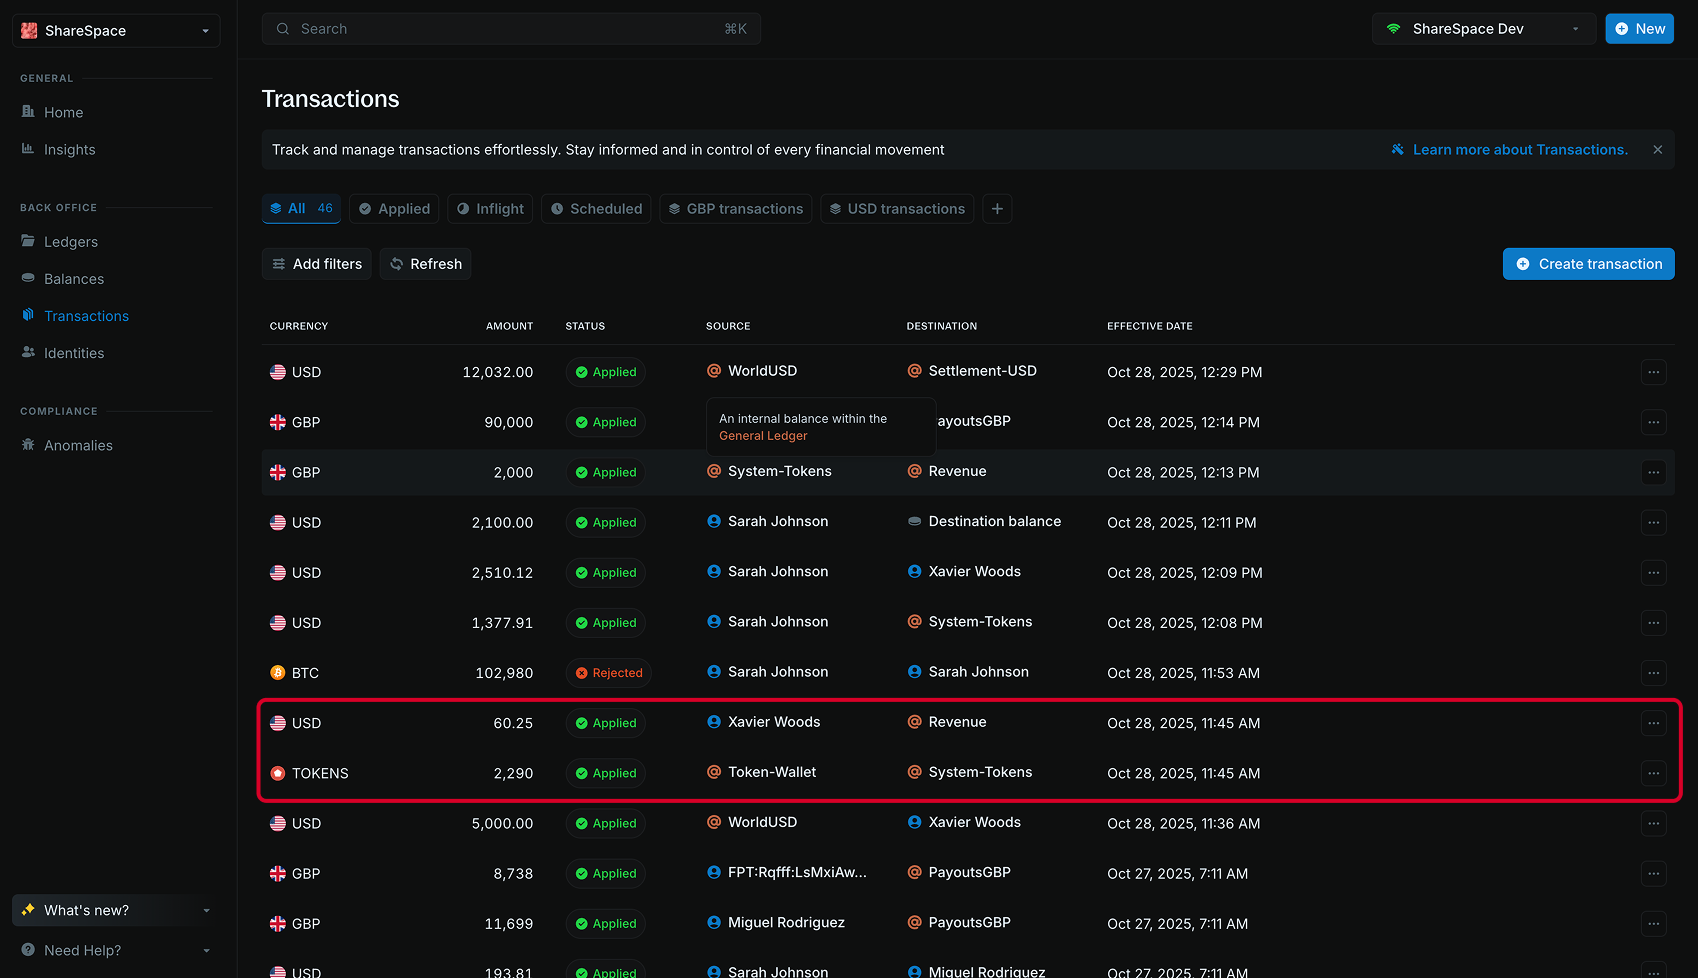 The response includes a `batch_id` that links both legs of the transaction in your ledger.
You can use `meta_data` to attach extra details to each transaction, such as the model name, prompt type, or customer ID.
***
## 4: Prepaid vs postpaid billing
Your system can support both prepaid and postpaid billing models.
With prepaid billing, customers fund their wallet before using your product:
* The customer must have sufficient balance before usage
* The corresponding dollar cost is deducted from the customer wallet
* If the wallet balance becomes insufficient or reaches zero, the transaction fails
* The customer must top up their wallet to continue using the product
In the bulk transaction from step 3, set `allow_overdraft: false` on the USD leg to enforce prepaid behavior.
With postpaid billing, customers don't need to fund their wallet in advance:
* Usage accumulates with the balance moving into overdraft (using `allow_overdraft: true` on the USD leg)
* The overdraft balance represents how much the customer owes
* At the end of the billing period, retrieve the overdraft amount to generate an invoice
* Once payment is made, the balance resets to zero and the next cycle begins.
***
## Conclusion
You now have a fully functional AI billing system built with Blnk Finance. This system can:
* Create and manage customer wallets for tracking usage per customer
* Fund customer wallets for prepaid billing models
* Track token usage and calculate costs atomically
* Support both prepaid and postpaid billing models
* Generate accurate invoices from accumulated usage
***
Get dedicated support for architecture reviews, integration planning, ledger workflows, and production deployment.
The response includes a `batch_id` that links both legs of the transaction in your ledger.
You can use `meta_data` to attach extra details to each transaction, such as the model name, prompt type, or customer ID.
***
## 4: Prepaid vs postpaid billing
Your system can support both prepaid and postpaid billing models.
With prepaid billing, customers fund their wallet before using your product:
* The customer must have sufficient balance before usage
* The corresponding dollar cost is deducted from the customer wallet
* If the wallet balance becomes insufficient or reaches zero, the transaction fails
* The customer must top up their wallet to continue using the product
In the bulk transaction from step 3, set `allow_overdraft: false` on the USD leg to enforce prepaid behavior.
With postpaid billing, customers don't need to fund their wallet in advance:
* Usage accumulates with the balance moving into overdraft (using `allow_overdraft: true` on the USD leg)
* The overdraft balance represents how much the customer owes
* At the end of the billing period, retrieve the overdraft amount to generate an invoice
* Once payment is made, the balance resets to zero and the next cycle begins.
***
## Conclusion
You now have a fully functional AI billing system built with Blnk Finance. This system can:
* Create and manage customer wallets for tracking usage per customer
* Fund customer wallets for prepaid billing models
* Track token usage and calculate costs atomically
* Support both prepaid and postpaid billing models
* Generate accurate invoices from accumulated usage
***
Get dedicated support for architecture reviews, integration planning, ledger workflows, and production deployment.