> ## Documentation Index
> Fetch the complete documentation index at: https://docs.blnkfinance.com/llms.txt
> Use this file to discover all available pages before exploring further.

# Deploy the Blnk Production License

> Deploy the Cloud Dashboard with a Production License, then connect your self-hosted Core.

export const RelatedTopics = ({title = "Related topics", items = []}) => {
  if (!items.length) {
    return null;
  }
  return <nav className="related-topics not-prose mt-20 mb-10 flex flex-col" aria-label={title}>
      <p className="related-topics-heading m-0 border-b border-zinc-200 pb-3 text-sm font-medium text-zinc-500 dark:border-white/10 dark:text-zinc-400">
        {title}
      </p>
      <ul className="related-topics-list m-0 mt-3 flex list-none flex-col gap-0.5 p-0">
        {items.map(item => {
    const isExternal = typeof item.href === "string" && (/^https?:\/\//i).test(item.href);
    return <li key={item.href} className="m-0 p-0">
              <a href={item.href} target={isExternal ? "_blank" : undefined} rel={isExternal ? "noopener noreferrer" : undefined} className="related-topics-link group inline-flex items-center gap-2 text-sm font-semibold text-zinc-700 no-underline transition-colors dark:text-zinc-300">
                <svg xmlns="http://www.w3.org/2000/svg" viewBox="0 0 24 24" width="16" height="16" fill="none" stroke="currentColor" strokeWidth="2" strokeLinecap="round" strokeLinejoin="round" className="related-topics-icon shrink-0 text-zinc-400 dark:text-zinc-500" aria-hidden="true">
                  <path d="M15 2H6a2 2 0 0 0-2 2v16a2 2 0 0 0 2 2h12a2 2 0 0 0 2-2V7Z" />
                  <path d="M14 2v4a2 2 0 0 0 2 2h4" />
                  <path d="M10 9H8" />
                  <path d="M16 13H8" />
                  <path d="M16 17H8" />
                </svg>
                <span className="relative top-px transition-colors group-hover:text-[#DD7B1B]">
                  {item.title}
                </span>
              </a>
            </li>;
  })}
      </ul>
    </nav>;
};

export const CtaCallout = props => {
  const {title, buttonLabel, href, trackingEvent, buttonTarget, rel = "noopener noreferrer", children} = props;
  const handleCtaClick = () => {
    if (typeof window === "undefined" || !trackingEvent) {
      return;
    }
    try {
      window.dispatchEvent(new CustomEvent("blnk:docs-cta", {
        detail: {
          name: trackingEvent,
          href
        }
      }));
    } catch {}
    try {
      window.posthog?.capture?.(trackingEvent, {
        href
      });
    } catch {}
    const gaPayload = {
      cta_href: href
    };
    try {
      window.gtag?.("event", trackingEvent, gaPayload);
    } catch {}
    try {
      window.dataLayer = window.dataLayer || [];
      window.dataLayer.push({
        event: trackingEvent,
        ...gaPayload
      });
    } catch {}
  };
  const isExternal = typeof href === "string" && (/^https?:\/\//i).test(href);
  const target = buttonTarget ?? (isExternal ? "_blank" : undefined);
  const linkRel = isExternal ? rel : undefined;
  return <section className="cta-callout not-prose relative my-8 w-full min-w-0 overflow-hidden rounded-xl border border-zinc-200 p-5 dark:border-white/10">
      <div className="cta-callout-noise" aria-hidden="true" />
      <div className="cta-callout-layout">
        {title ? <div className="cta-callout-title-row">
            <svg xmlns="http://www.w3.org/2000/svg" viewBox="0 0 28 28" width="14" height="14" className="cta-callout-icon shrink-0 text-zinc-800 dark:text-zinc-200" aria-hidden="true">
              <g fill="none" fillRule="nonzero">
                <path d="M28 0v28H0V0h28ZM14.691833333333335 27.134333333333334l-0.012833333333333334 0.0023333333333333335 -0.08283333333333333 0.04083333333333334 -0.023333333333333334 0.004666666666666667 -0.016333333333333335 -0.004666666666666667 -0.08283333333333333 -0.04083333333333334c-0.011666666666666667 -0.004666666666666667 -0.022166666666666668 -0.0011666666666666668 -0.028000000000000004 0.005833333333333334l-0.004666666666666667 0.011666666666666667 -0.019833333333333335 0.49933333333333335 0.005833333333333334 0.023333333333333334 0.011666666666666667 0.015166666666666667 0.12133333333333333 0.08633333333333333 0.0175 0.004666666666666667 0.014000000000000002 -0.004666666666666667 0.12133333333333333 -0.08633333333333333 0.014000000000000002 -0.018666666666666668 0.004666666666666667 -0.019833333333333335 -0.019833333333333335 -0.4981666666666667c-0.0023333333333333335 -0.011666666666666667 -0.0105 -0.019833333333333335 -0.019833333333333335 -0.021Zm0.3091666666666667 -0.13183333333333336 -0.015166666666666667 0.0023333333333333335 -0.21583333333333335 0.1085 -0.011666666666666667 0.011666666666666667 -0.0035000000000000005 0.012833333333333334 0.021 0.5016666666666667 0.005833333333333334 0.014000000000000002 0.009333333333333334 0.008166666666666668 0.23450000000000004 0.1085c0.014000000000000002 0.004666666666666667 0.026833333333333334 0 0.03383333333333334 -0.009333333333333334l0.004666666666666667 -0.016333333333333335 -0.03966666666666667 -0.7163333333333334c-0.0035000000000000005 -0.014000000000000002 -0.011666666666666667 -0.023333333333333334 -0.023333333333333334 -0.025666666666666667Zm-0.8341666666666667 0.0023333333333333335a0.026833333333333334 0.026833333333334334 0 0 0 -0.0315 0.007000000000000001l-0.007000000000000001 0.016333333333333335 -0.03966666666666667 0.7163333333333334c0 0.014000000000000002 0.008166666666666668 0.023333333333333334 0.019833333333333335 0.028000000000000004l0.0175 -0.0023333333333333335 0.23450000000000004 -0.1085 0.011666666666666667 -0.009333333333333334 0.004666666666666667 -0.012833333333333334 0.019833333333333335 -0.5016666666666667 -0.0035000000000000005 -0.014000000000000002 -0.011666666666666667 -0.011666666666666667 -0.21466666666666667 -0.10733333333333334Z" strokeWidth="1.1667" />
                <path fill="currentColor" d="M14 2.916666666666667A1.75 1.75 0 0 1 15.750000000000002 4.666666666666667v6.302333333333334L21.207666666666668 7.816666666666667a1.75 1.75 0 0 1 1.75 3.031L17.5 14l5.457666666666667 3.151166666666667a1.75 1.75 0 0 1 -1.75 3.031l-5.457666666666667 -3.1500000000000004V23.333333333333336a1.75 1.75 0 0 1 -3.5 0v-6.302333333333334L6.792333333333334 20.183333333333337a1.75 1.75 0 1 1 -1.75 -3.031L10.5 14 5.042333333333334 10.848833333333333a1.75 1.75 0 0 1 1.75 -3.031l5.457666666666667 3.1500000000000004V4.666666666666667A1.75 1.75 0 0 1 14 2.916666666666667Z" strokeWidth="1.1667" />
              </g>
            </svg>
            <p className="cta-callout-title min-w-0 font-semibold text-zinc-800 dark:text-zinc-200">
              {title}
            </p>
          </div> : null}
        <div className={`cta-callout-body text-sm leading-normal text-zinc-800 dark:text-zinc-200${title ? " cta-callout-body--indented" : ""}`}>
          {children}
        </div>
        <a href={href} target={target} rel={linkRel} onClick={handleCtaClick} data-docs-cta={trackingEvent || undefined} className="cta-callout-button inline-flex items-center justify-center gap-1 rounded-full bg-white px-3 py-1.5 text-sm font-semibold transition hover:bg-zinc-100 focus-visible:outline focus-visible:outline-2 focus-visible:outline-offset-2 focus-visible:outline-white/50 dark:bg-white dark:hover:bg-zinc-200">
          {buttonLabel}
          <span className="cta-callout-button-arrow" aria-hidden="true">
            →
          </span>
        </a>
      </div>
    </section>;
};

The Production License lets you run the Cloud Dashboard in your own infrastructure.

We recommend deploying [Blnk Core](/home/install) separately, then running the dashboard and [connecting your Core](/cloud/instances/create) to it.

Built for teams that need stronger security controls, data residency support, custom tooling, or a closer operational partnership with Blnk.

<CtaCallout title="Want a dedicated Production setup?" href="https://blnkfinance.com/contact/us?utm_source=blnk_docs&utm_medium=documentation&utm_campaign=cloud%2Fstart%2Flicense%2Fstart" buttonLabel="Get production license" trackingEvent="clicked_production_license">
  Get a Production License tailored to your deployment needs.
</CtaCallout>

***

## Dashboard deployment guide

Use this guide to deploy the Cloud Dashboard on AWS, GCP, Azure, or any cloud provider.

<Steps>
  <Step title="Get your Production License">
    When you purchase a Production License, you'll receive an email with your license key.

    Use the base64 value from the email as `ENTERPRISE_LICENSE_B64` in step 4.
  </Step>

  <Step title="Prepare your database">
    Create a managed Postgres instance in your environment. Use a recent supported Postgres version and enable TLS for production.

    Create one database for the Cloud Dashboard:

    ```sql theme={"system"}
    CREATE DATABASE "blnk-cloud";
    ```

    <Tip>Save the connection URL for the instance. You will use it as `ENTERPRISE_POSTGRES_URL` in the next step.</Tip>
  </Step>

  <Step title="Pull the Docker image">
    Pull the enterprise image from GitHub Container Registry:

    ```bash Docker theme={"system"}
    docker pull ghcr.io/blnkfinance/blnk-enterprise:0.1.23
    ```

    <Note>
      Using a custom image? Use the image name provided in your license email or onboarding instructions.
    </Note>
  </Step>

  <Step title="Add primary environment variables">
    Create an environment file, such as `.env` or `enterprise.env`.

    Add the following variables and replace the placeholder values with your Postgres URL and license key.

    ```dotenv .env wrap theme={"system"}
    HOSTNAME=127.0.0.1
    ENTERPRISE_POSTGRES_URL=postgres://user:password@host:5432/postgres?sslmode=require
    ENTERPRISE_LICENSE_B64=your_base64_license_string
    ENTERPRISE_SKIP_CORE=true
    ```

    | Environment variable      | Description                                                                                                  |
    | :------------------------ | :----------------------------------------------------------------------------------------------------------- |
    | `HOSTNAME`                | Use `127.0.0.1` so health checks and internal services communicate through the container loopback interface. |
    | `ENTERPRISE_POSTGRES_URL` | Connection string for the Postgres instance that hosts the `blnk-cloud` database.                            |
    | `ENTERPRISE_LICENSE_B64`  | Base64-encoded license key from step 1.                                                                      |
  </Step>

  <Step title="Set up public app config">
    Add these variables to the same environment file. They configure how users access the Cloud Dashboard.

    ```dotenv .env wrap theme={"system"}
    ENTERPRISE_PUBLIC_PORT=8080
    ENTERPRISE_PUBLIC_URL=https://ledger.yourdomain.com
    ```

    | Environment variable     | Description                                                                                                                               |
    | :----------------------- | :---------------------------------------------------------------------------------------------------------------------------------------- |
    | `ENTERPRISE_PUBLIC_PORT` | Port exposed by the enterprise launcher for the Cloud Dashboard.                                                                          |
    | `ENTERPRISE_PUBLIC_URL`  | Public URL where users access the Cloud Dashboard, including `https://`. Use this value when configuring `CORS_ORIGINS` in the next step. |
  </Step>

  <Step title="Set up Plane environment variables">
    Plane powers the Cloud Dashboard and stores its data in the `blnk-cloud` database.

    Add these variables to the same environment file you created in the previous step.

    ```dotenv .env wrap theme={"system"}
    CORS_ORIGINS=http://localhost:8080,http://localhost:3001,https://ledger.yourdomain.com
    BLNK_ENCRYPTION_KEY=0123456789abcdef0123456789abcdef
    JWT_SECRET=your_long_random_secret_here
    ```

    | Environment variable  | Description                                                                                                                                                                                |
    | :-------------------- | :----------------------------------------------------------------------------------------------------------------------------------------------------------------------------------------- |
    | `CORS_ORIGINS`        | Comma-separated list of browser origins allowed to access the Plane API. Do not include spaces. Make sure `ENTERPRISE_PUBLIC_URL` is included.                                             |
    | `BLNK_ENCRYPTION_KEY` | A unique 32-character key used to encrypt sensitive data, such as instance connection keys. Do not change this value after deployment, or previously encrypted data may become unreadable. |
    | `JWT_SECRET`          | A strong random secret used to sign and verify authentication tokens.                                                                                                                      |
  </Step>

  <Step title="Run the enterprise image">
    Start the dashboard with the image you pulled earlier. Map the host port to `ENTERPRISE_PUBLIC_PORT`, e.g. `8080` if you used the value from the public app config step.

    ```bash Docker theme={"system"}
    docker run -d \
      --name blnk-enterprise \
      -p 8080:8080 \
      ghcr.io/blnkfinance/blnk-enterprise:0.1.23
    ```

    Confirm that your deployment is live:

    ```bash Check deployment status theme={"system"}
    docker ps
    ```
  </Step>
</Steps>

***

## Connecting your Core

Connect your Core instance to your dashboard with the Query Agent.

<Steps>
  <Step title="Deploy Blnk Core">
    Make sure you have a running Core instance.

    Follow [our Core deployment guide](/home/deploy) for setup, scaling, and production hardening.
  </Step>

  <Step title="Create an instance on the dashboard">
    1. Open `ENTERPRISE_PUBLIC_URL` in your browser, sign up, and create your workspace.

    2. Click **Connect new instance** from the homepage.

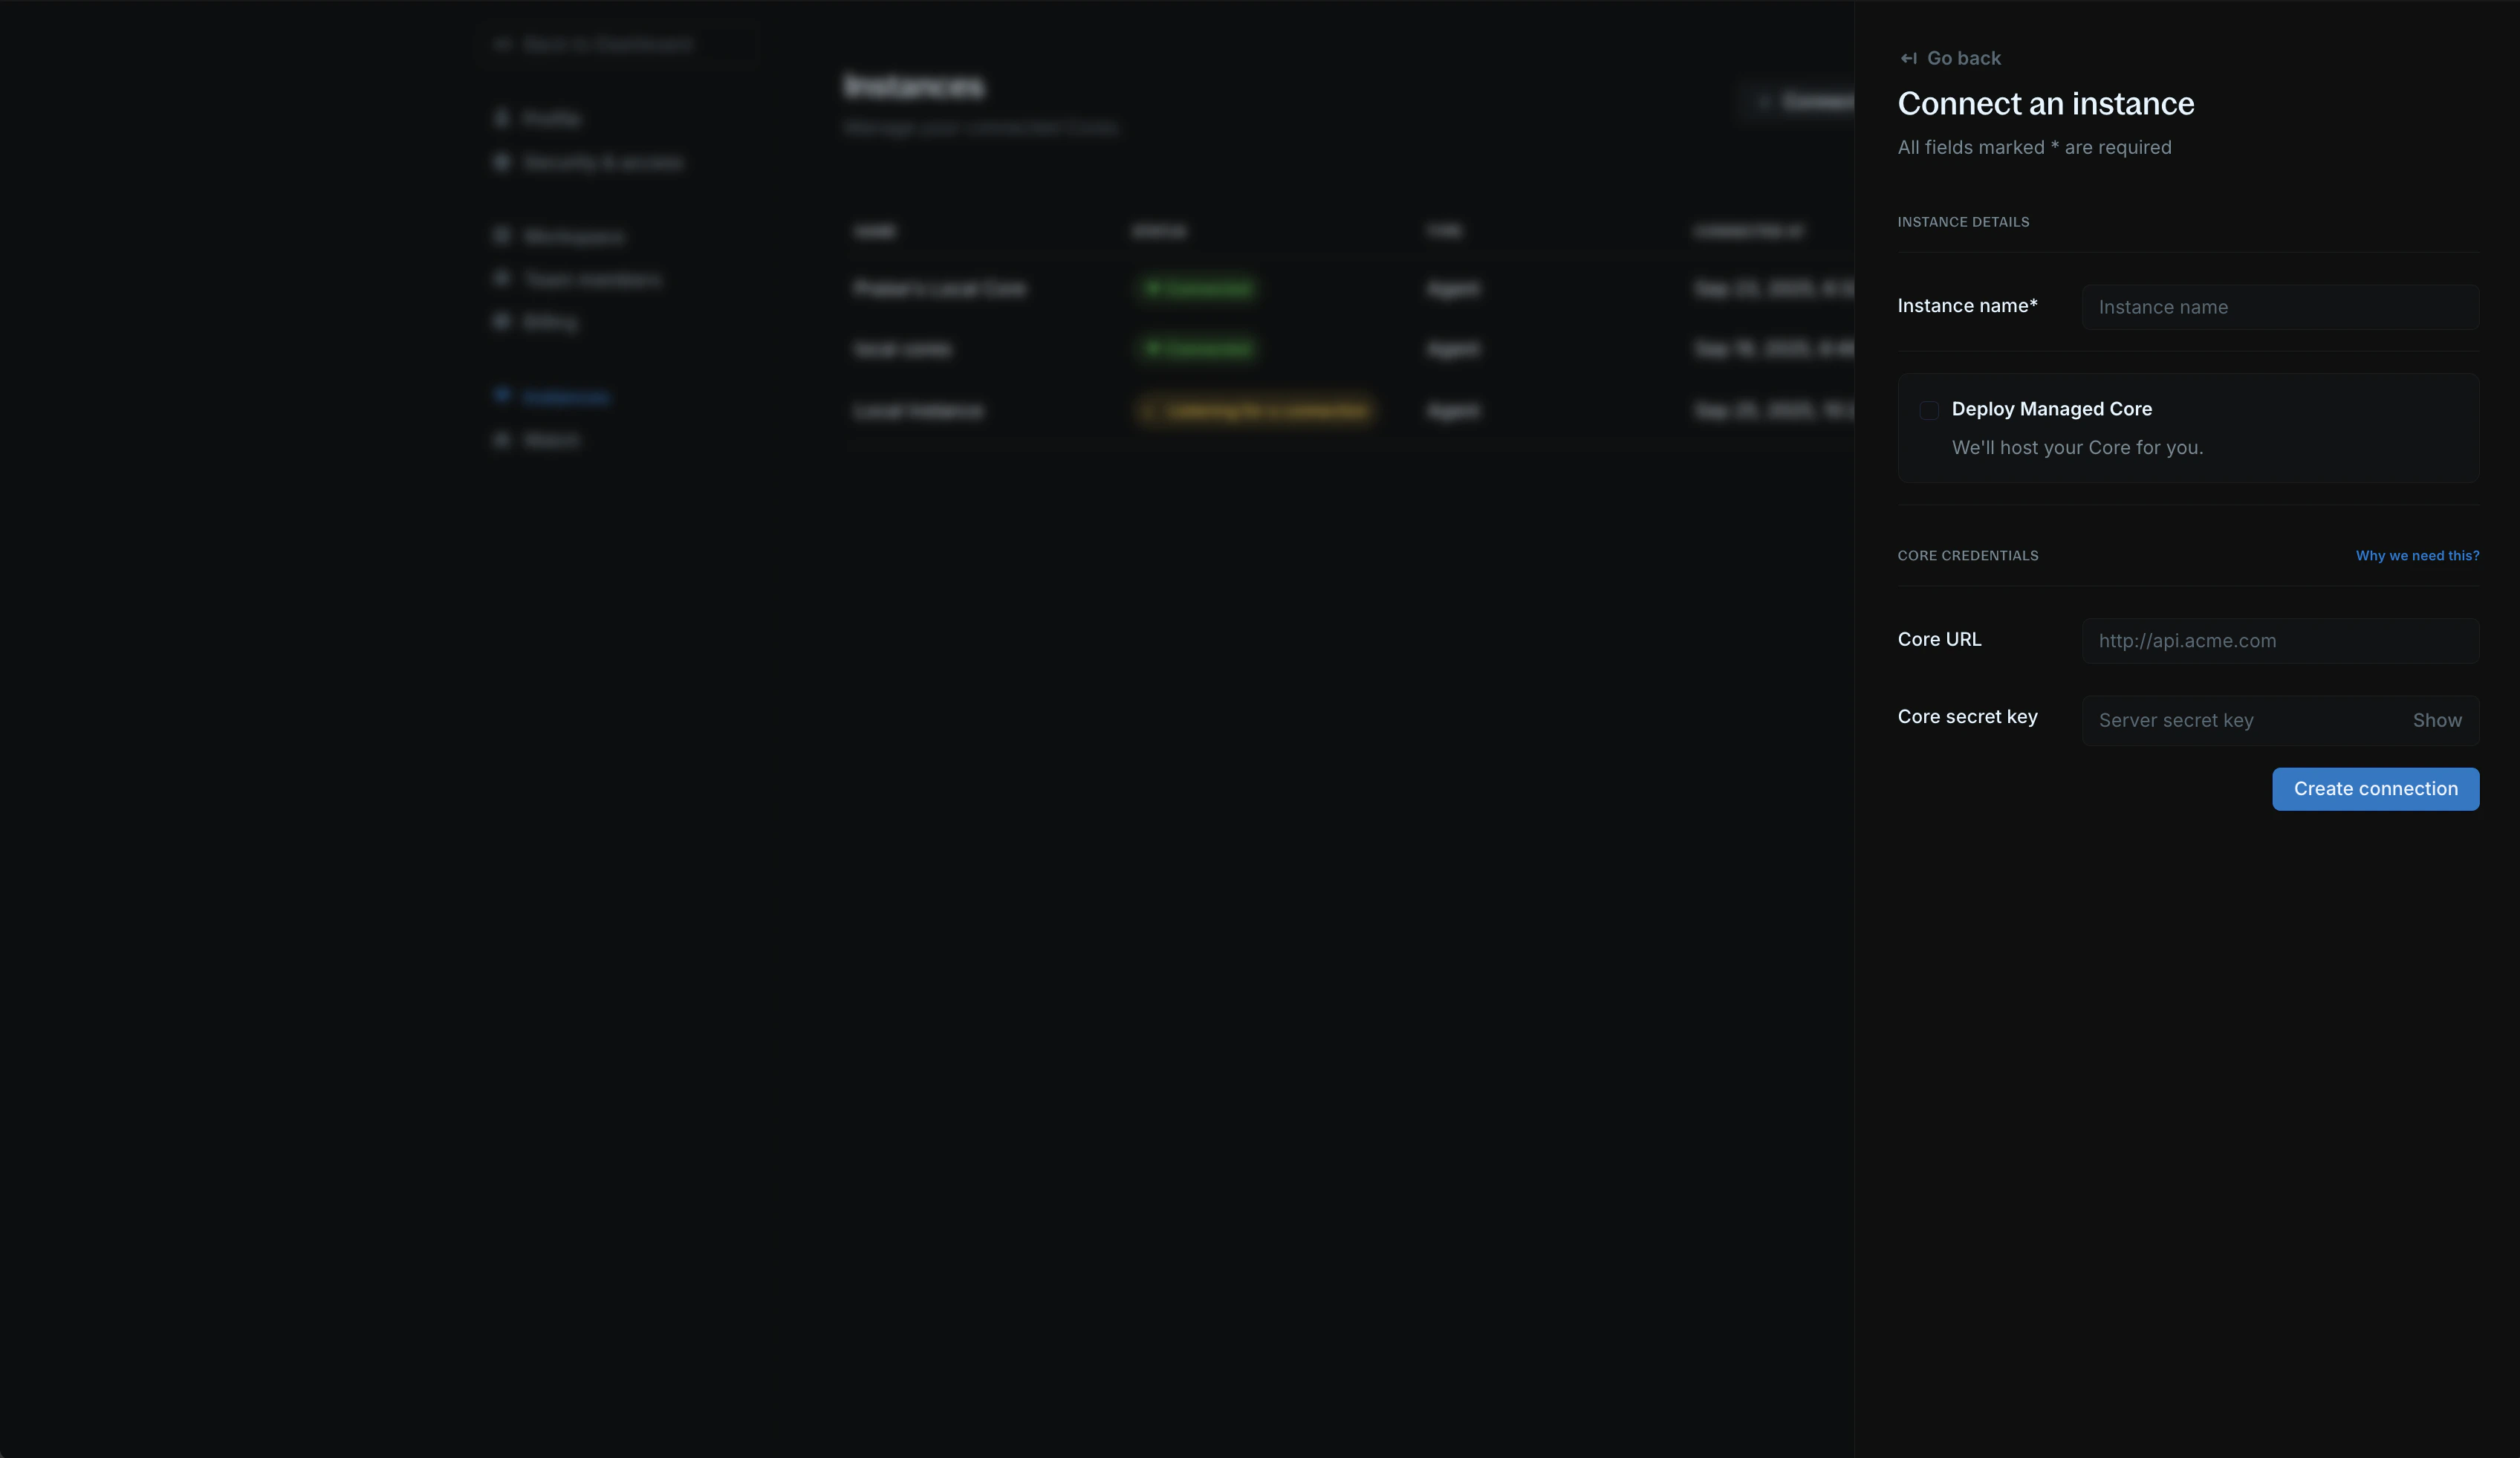
    3. Enter your Core URL and secret key, then submit the form.

           <img src="https://mintcdn.com/blnk/JB9Zhph4DjE0VsHT/cloud/img/instances/instance-creation-form.png?fit=max&auto=format&n=JB9Zhph4DjE0VsHT&q=85&s=d466955fbf83ff90709b1ce53290312e" alt="Instance creation form with instance name, Core URL, and secret key fields" className="rounded-lg" width="3392" height="1962" data-path="cloud/img/instances/instance-creation-form.png" />

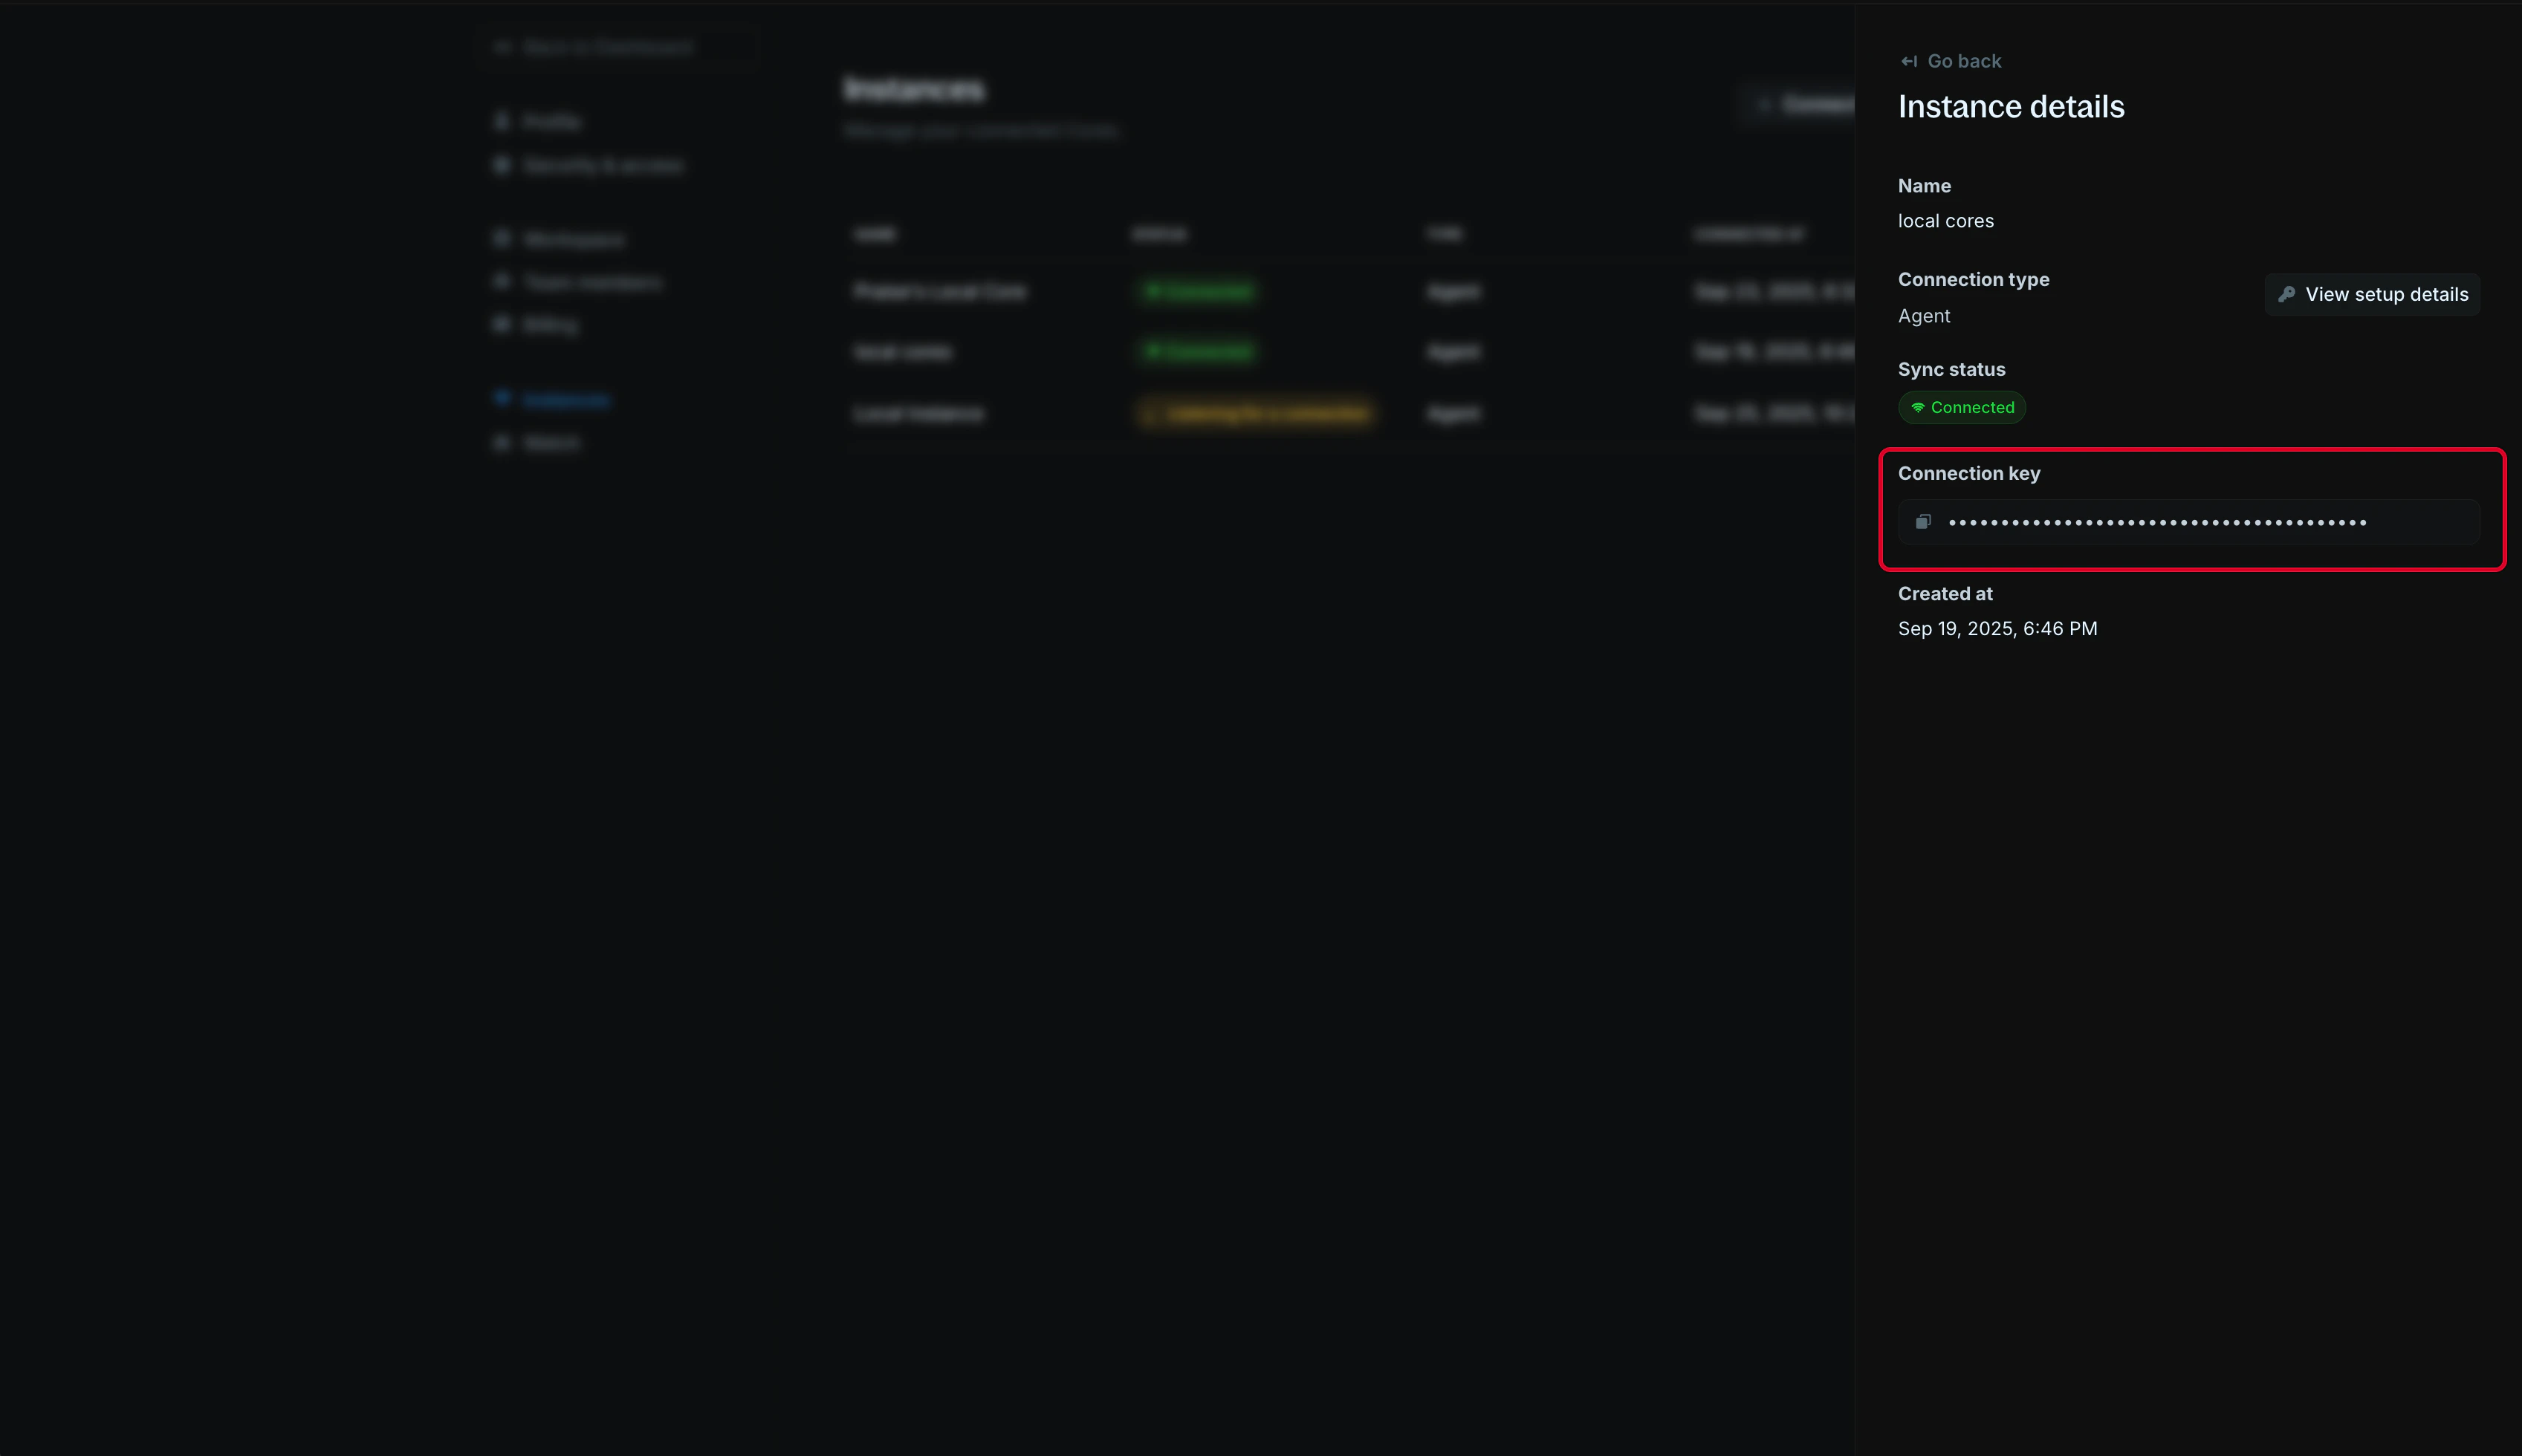
    4. Copy the **Connection key** from the instance details page.
           <img src="https://mintcdn.com/blnk/JB9Zhph4DjE0VsHT/cloud/img/instances/connection-key-details.png?fit=max&auto=format&n=JB9Zhph4DjE0VsHT&q=85&s=74f260f7e4fa9891e1a094977d17f539" alt="Instance details page showing where to find the connection key" className="rounded-lg" width="3394" height="1960" data-path="cloud/img/instances/connection-key-details.png" />
  </Step>

  <Step title="Run the Query Agent">
    Run the Query Agent where it can reach your Core database, and set the connection URL to the WebSocket version of `ENTERPRISE_PUBLIC_URL` with path `/ws/agent`:

    | `ENTERPRISE_PUBLIC_URL`         | `CONNECTION_URL`                       |
    | :------------------------------ | :------------------------------------- |
    | `https://ledger.yourdomain.com` | `wss://ledger.yourdomain.com/ws/agent` |
    | `http://localhost:8080`         | `ws://localhost:8080/ws/agent`         |

    ```bash Run Query Agent wrap theme={"system"}
    docker run -d \
      -e DB_URL="postgres://username:password@host:5432/blnk?sslmode=require" \
      -e CONNECTION_KEY="sk_live_..." \
      -e CONNECTION_URL="wss://ledger.yourdomain.com/ws/agent" \
      blnkfinance/query-agent:latest
    ```

    | Parameter        | Description                                                                                                      |
    | :--------------- | :--------------------------------------------------------------------------------------------------------------- |
    | `DB_URL`         | Postgres connection string for your Core database. Find it in the `database_url` field in your `blnk.json` file. |
    | `CONNECTION_KEY` | Connection key from the instance details page in the dashboard.                                                  |
    | `CONNECTION_URL` | WebSocket URL for your dashboard.                                                                                |
  </Step>

  <Step title="Verify connection">
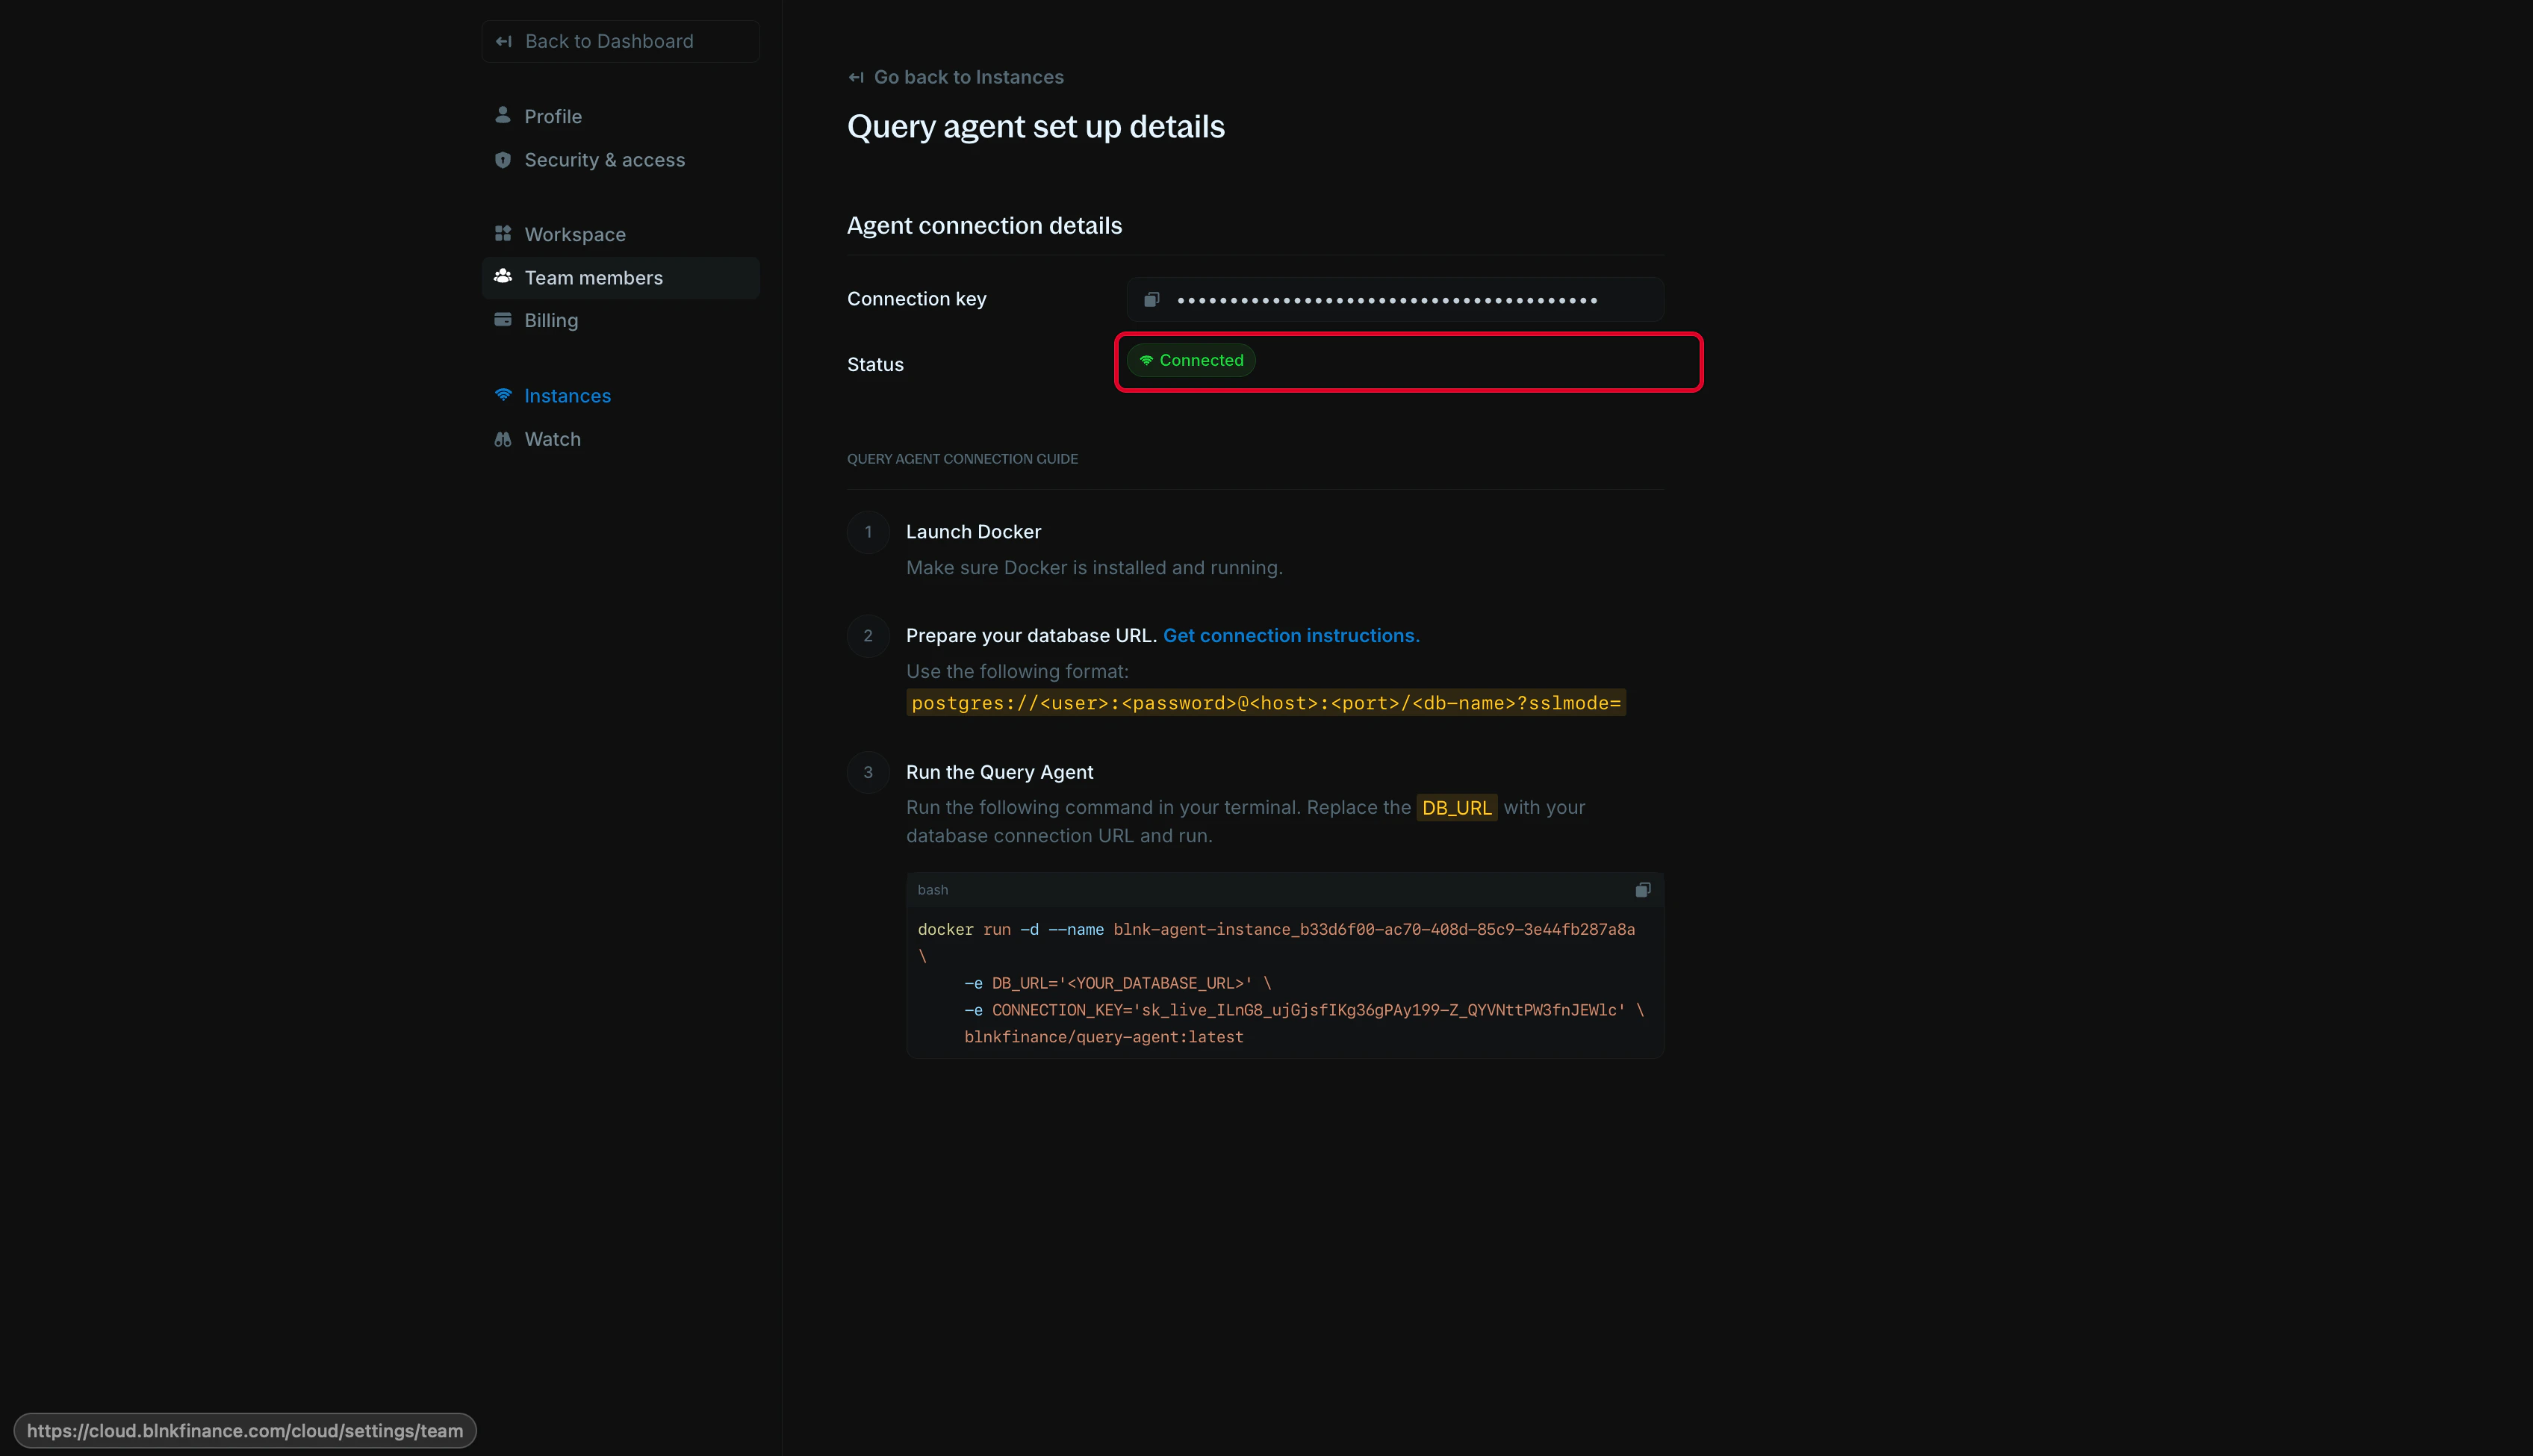
    Go to **Settings > Instances** in the dashboard. Your instance should show as **Connected** with a green indicator.
    <img src="https://mintcdn.com/blnk/JB9Zhph4DjE0VsHT/cloud/img/instances/instance-connection-status.png?fit=max&auto=format&n=JB9Zhph4DjE0VsHT&q=85&s=c61f72eb20969aaa10490bda8c9b1cb2" alt="Instance connection status showing Connected with green indicator" className="rounded-lg" width="3392" height="1950" data-path="cloud/img/instances/instance-connection-status.png" />
  </Step>
</Steps>

<RelatedTopics
  items={[
{ title: "License configuration", href: "/cloud/start/license/configuration" },
{ title: "Connect instance", href: "/cloud/instances/create" },
{ title: "Deploy Core", href: "/home/deploy" },
]}
/>