> ## Documentation Index
> Fetch the complete documentation index at: https://docs.blnkfinance.com/llms.txt
> Use this file to discover all available pages before exploring further.
# Launching Your App
> Publish and launch your custom app in Blnk Cloud.
export const CtaCallout = props => {
const {title, buttonLabel, href, trackingEvent, buttonTarget, rel = "noopener noreferrer", children} = props;
const handleCtaClick = () => {
if (typeof window === "undefined" || !trackingEvent) {
return;
}
try {
window.dispatchEvent(new CustomEvent("blnk:docs-cta", {
detail: {
name: trackingEvent,
href
}
}));
} catch {}
try {
window.posthog?.capture?.(trackingEvent, {
href
});
} catch {}
const gaPayload = {
cta_href: href
};
try {
window.gtag?.("event", trackingEvent, gaPayload);
} catch {}
try {
window.dataLayer = window.dataLayer || [];
window.dataLayer.push({
event: trackingEvent,
...gaPayload
});
} catch {}
};
const isExternal = typeof href === "string" && (/^https?:\/\//i).test(href);
const target = buttonTarget ?? (isExternal ? "_blank" : undefined);
const linkRel = isExternal ? rel : undefined;
return ;
};
This feature is in private beta. If you want access, please [contact Support](mailto:support@blnkfinance.com?subject=Interested%20in%20Custom%20Apps).
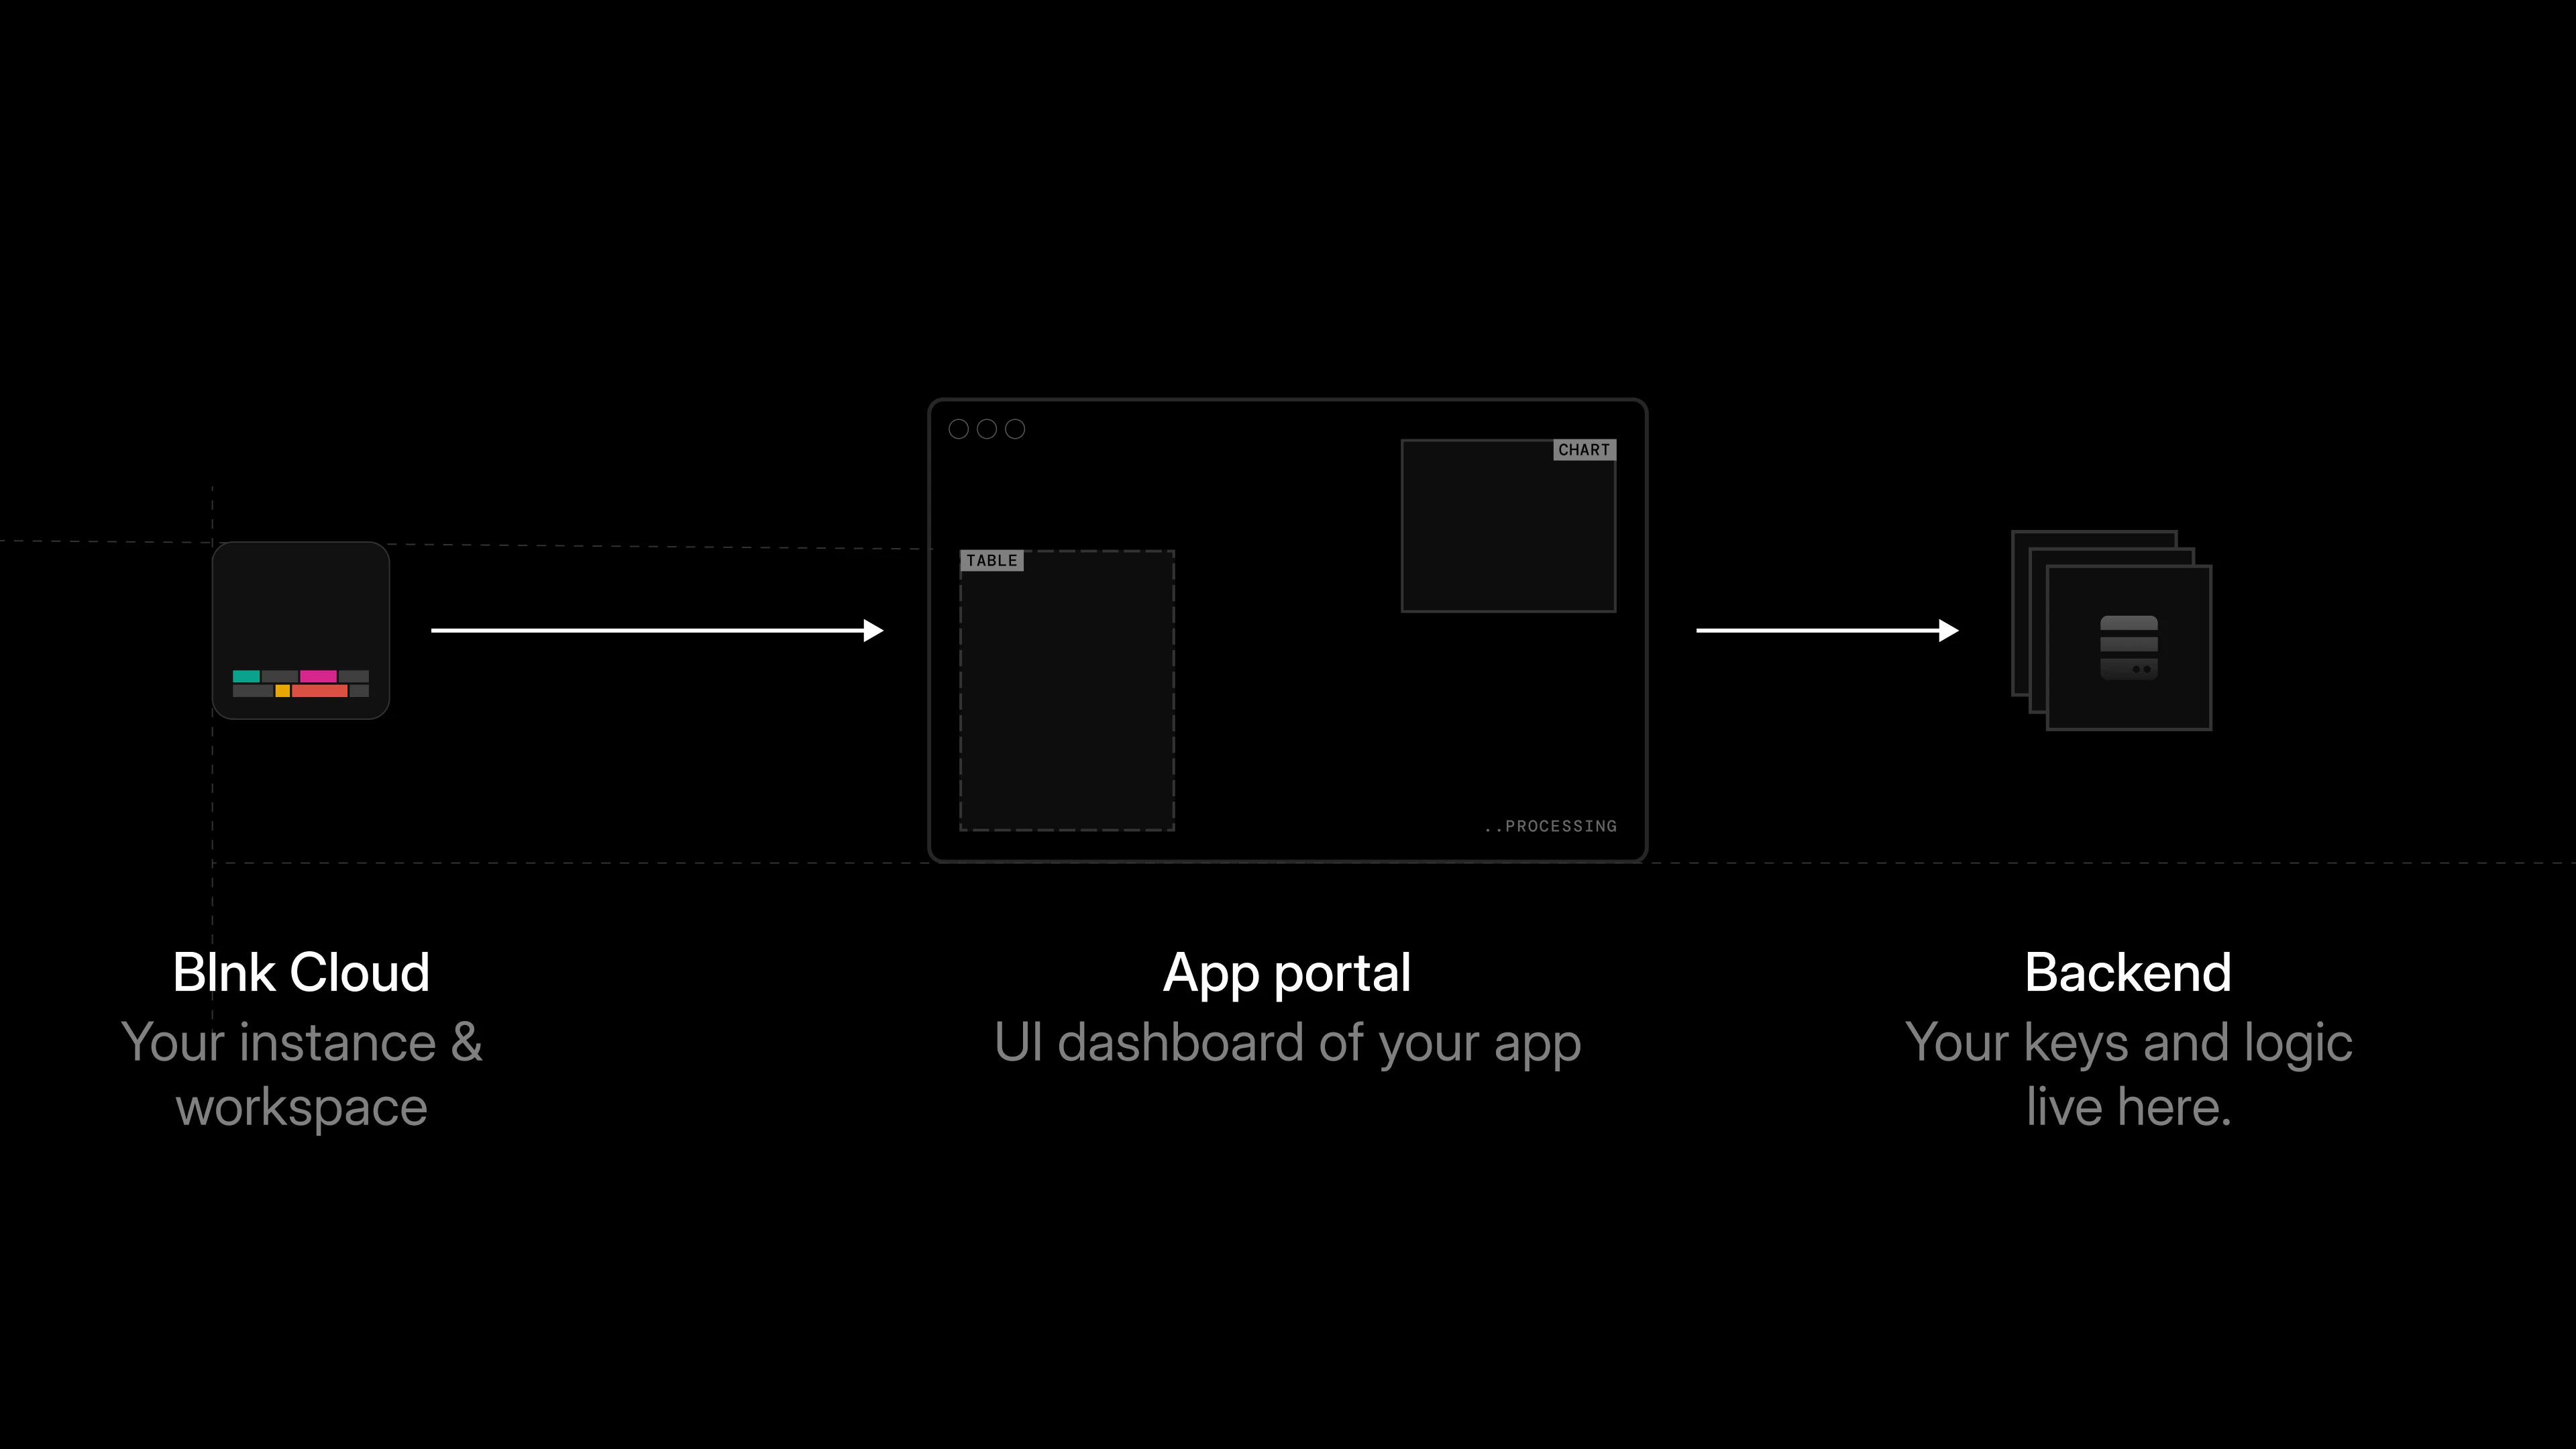
Now, that your app is installed and working well, you can launch it from the Cloud dashboard.
Just like the install process, the launch process starts in Blnk Cloud. When a user clicks `Launch app` in Blnk Cloud:
1. If the app requires it, the user confirms with their account password and 2FA code (same rules as install).
2. Blnk sends a `POST` request to your [portal generator URL](/cloud/apps/codebase-setup#set-up-app-routes).
3. Your app checks that the install exists and is active.
4. Your app creates a short-lived portal session.
5. Your app returns a `portal_url`.
6. Blnk opens that URL inside the dashboard.
 See [Best practices](/cloud/apps/best-practices#portal-and-dashboard-embedding) for the embedding policy, session guidance, and pre-launch checklist.
***
## Handling the portal request
Cloud sends a payload like this to your `portal_generator_url`:
```json generate_portal.json theme={"system"}
{
"installed_app_id": "instapp_...",
"app_id": "app_...",
"instance_id": "inst_..."
}
```
| Field | Description |
| ------------------ | ----------------------------------------------------------------------------- |
| `installed_app_id` | The ID for this specific app installation. Use it to find the install record. |
| `app_id` | The ID of the app being launched. |
| `instance_id` | The Cloud instance the app should work with. |
Before returning a portal URL, your app should confirm that:
* the install exists and is active
* the `instance_id` in the request matches the install record
```typescript validateInstallForPortal.ts wrap theme={"system"}
async function validateInstallForPortal(
installed_app_id: string,
app_id: string,
instance_id: string,
): Promise {
const install = await db.getInstall(installed_app_id);
const ok =
install != null &&
install.status === "active" &&
install.app_id === app_id &&
install.instance_id === instance_id;
if (!ok) {
return false;
}
return true;
}
```
***
## Create a portal session
Next, your app should create a portal session once the portal request is validated. The session helps your app know:
* which installation opened the portal
* which Cloud instance the portal is launched from
* when the session should expire
```typescript Create session theme={"system"}
import { randomBytes } from "node:crypto";
const PORTAL_BASE = "https://app.yourcompany.com";
const TTL_SECONDS = 900; // 900 seconds = 15 minutes
async function createPortalSession(
installed_app_id: string,
instance_id: string,
): Promise {
const ttlSeconds = TTL_SECONDS;
const expiry_time_ms = Date.now() + (ttlSeconds * 1000);
const token = randomBytes(32).toString("base64url");
await db.savePortalSession({
token,
installed_app_id,
instance_id,
expiry_time_ms,
});
const portalUrl = new URL(PORTAL_BASE);
portalUrl.searchParams.set("token", token);
return portalUrl.toString();
}
```
```typescript Verify session theme={"system"}
async function verifyPortalSession(token: string) {
const session = await db.getPortalSession(token);
if (!session) {
return { ok: false as const, status: 401 };
}
if (session.expiry_time_ms < Date.now()) {
return { ok: false as const, status: 410 };
}
return { ok: true as const, session };
}
```
We recommend keeping portal sessions short-lived. A 5 to 15 minute expiry is usually enough for launch sessions.
See [Best practices](/cloud/apps/best-practices#portal-and-dashboard-embedding) for the embedding policy, session guidance, and pre-launch checklist.
***
## Handling the portal request
Cloud sends a payload like this to your `portal_generator_url`:
```json generate_portal.json theme={"system"}
{
"installed_app_id": "instapp_...",
"app_id": "app_...",
"instance_id": "inst_..."
}
```
| Field | Description |
| ------------------ | ----------------------------------------------------------------------------- |
| `installed_app_id` | The ID for this specific app installation. Use it to find the install record. |
| `app_id` | The ID of the app being launched. |
| `instance_id` | The Cloud instance the app should work with. |
Before returning a portal URL, your app should confirm that:
* the install exists and is active
* the `instance_id` in the request matches the install record
```typescript validateInstallForPortal.ts wrap theme={"system"}
async function validateInstallForPortal(
installed_app_id: string,
app_id: string,
instance_id: string,
): Promise {
const install = await db.getInstall(installed_app_id);
const ok =
install != null &&
install.status === "active" &&
install.app_id === app_id &&
install.instance_id === instance_id;
if (!ok) {
return false;
}
return true;
}
```
***
## Create a portal session
Next, your app should create a portal session once the portal request is validated. The session helps your app know:
* which installation opened the portal
* which Cloud instance the portal is launched from
* when the session should expire
```typescript Create session theme={"system"}
import { randomBytes } from "node:crypto";
const PORTAL_BASE = "https://app.yourcompany.com";
const TTL_SECONDS = 900; // 900 seconds = 15 minutes
async function createPortalSession(
installed_app_id: string,
instance_id: string,
): Promise {
const ttlSeconds = TTL_SECONDS;
const expiry_time_ms = Date.now() + (ttlSeconds * 1000);
const token = randomBytes(32).toString("base64url");
await db.savePortalSession({
token,
installed_app_id,
instance_id,
expiry_time_ms,
});
const portalUrl = new URL(PORTAL_BASE);
portalUrl.searchParams.set("token", token);
return portalUrl.toString();
}
```
```typescript Verify session theme={"system"}
async function verifyPortalSession(token: string) {
const session = await db.getPortalSession(token);
if (!session) {
return { ok: false as const, status: 401 };
}
if (session.expiry_time_ms < Date.now()) {
return { ok: false as const, status: 410 };
}
return { ok: true as const, session };
}
```
We recommend keeping portal sessions short-lived. A 5 to 15 minute expiry is usually enough for launch sessions.
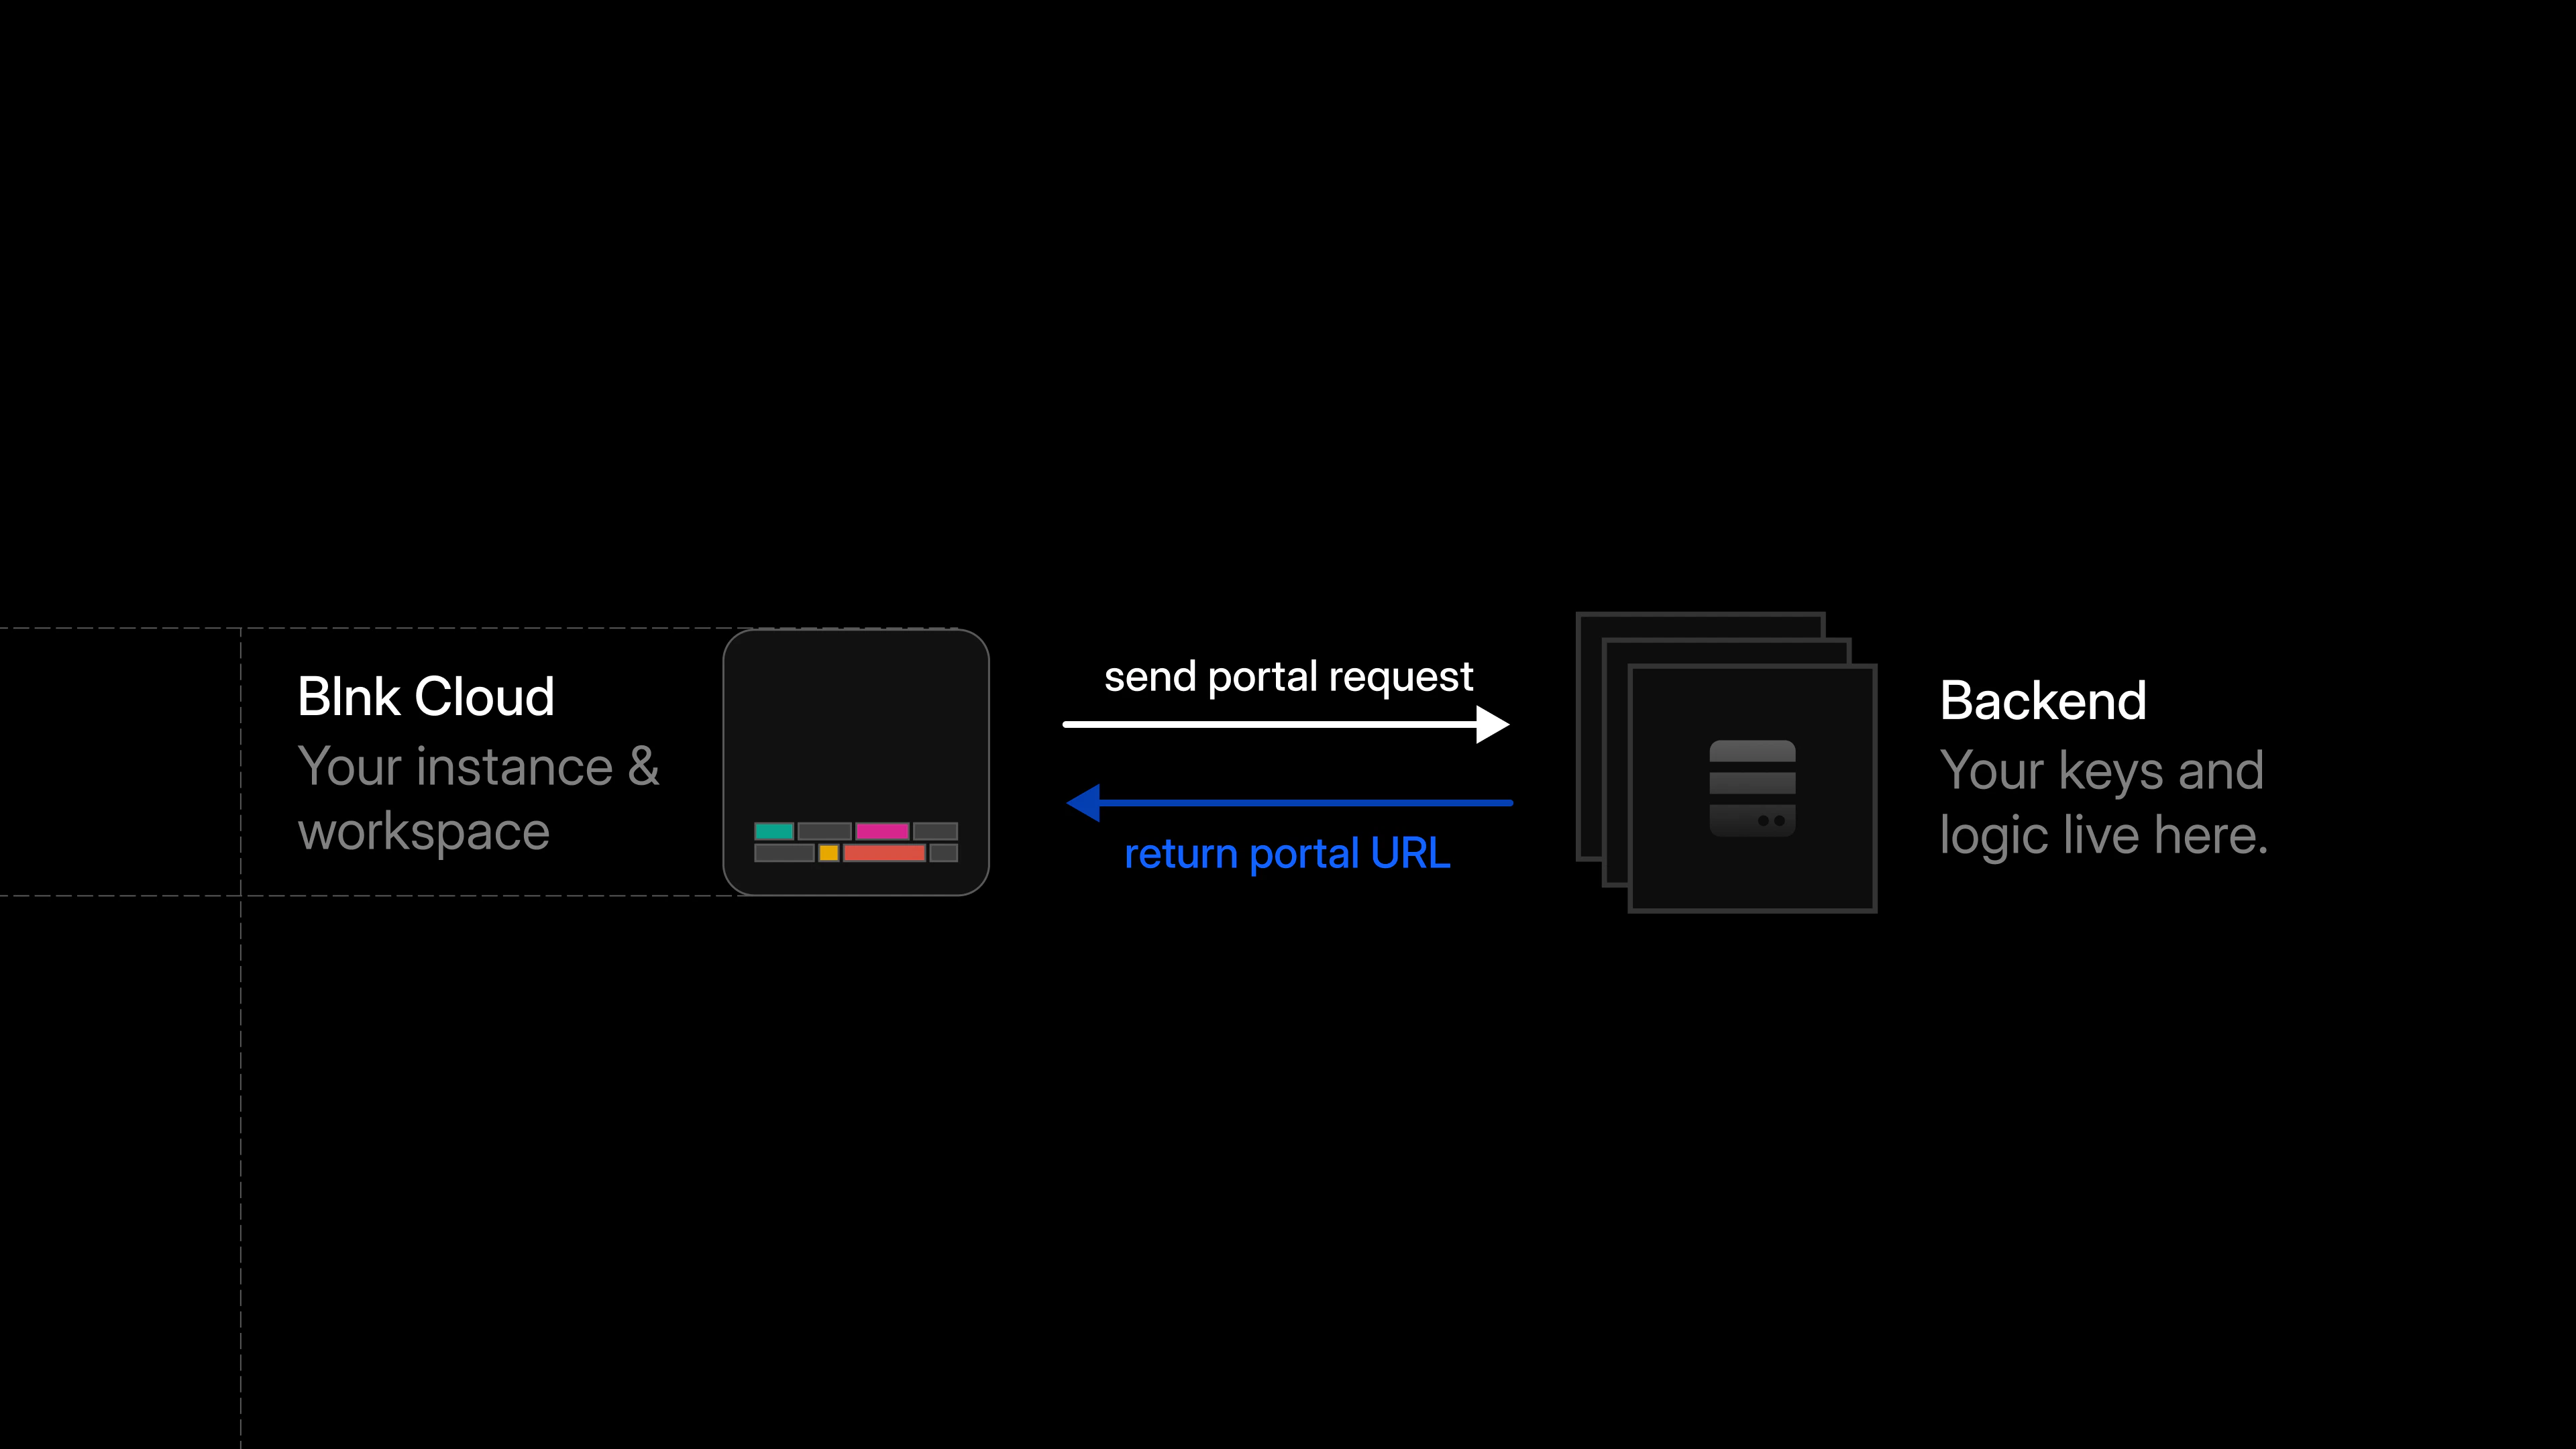 After creating the session, return a `portal_url` to Cloud. The response should look like this:
```json Expected response wrap theme={"system"}
{
"portal_url": "https://app.yourcompany.com/?token=short-lived"
}
```
Cloud then uses this URL to open your app inside the dashboard.
The portal URL should only point to your app interface. It should not include API keys, provider secrets, or any sensitive data.
***
## Load the app inside Cloud
When Cloud opens the `portal_url`, it loads your app inside the dashboard.
After creating the session, return a `portal_url` to Cloud. The response should look like this:
```json Expected response wrap theme={"system"}
{
"portal_url": "https://app.yourcompany.com/?token=short-lived"
}
```
Cloud then uses this URL to open your app inside the dashboard.
The portal URL should only point to your app interface. It should not include API keys, provider secrets, or any sensitive data.
***
## Load the app inside Cloud
When Cloud opens the `portal_url`, it loads your app inside the dashboard.
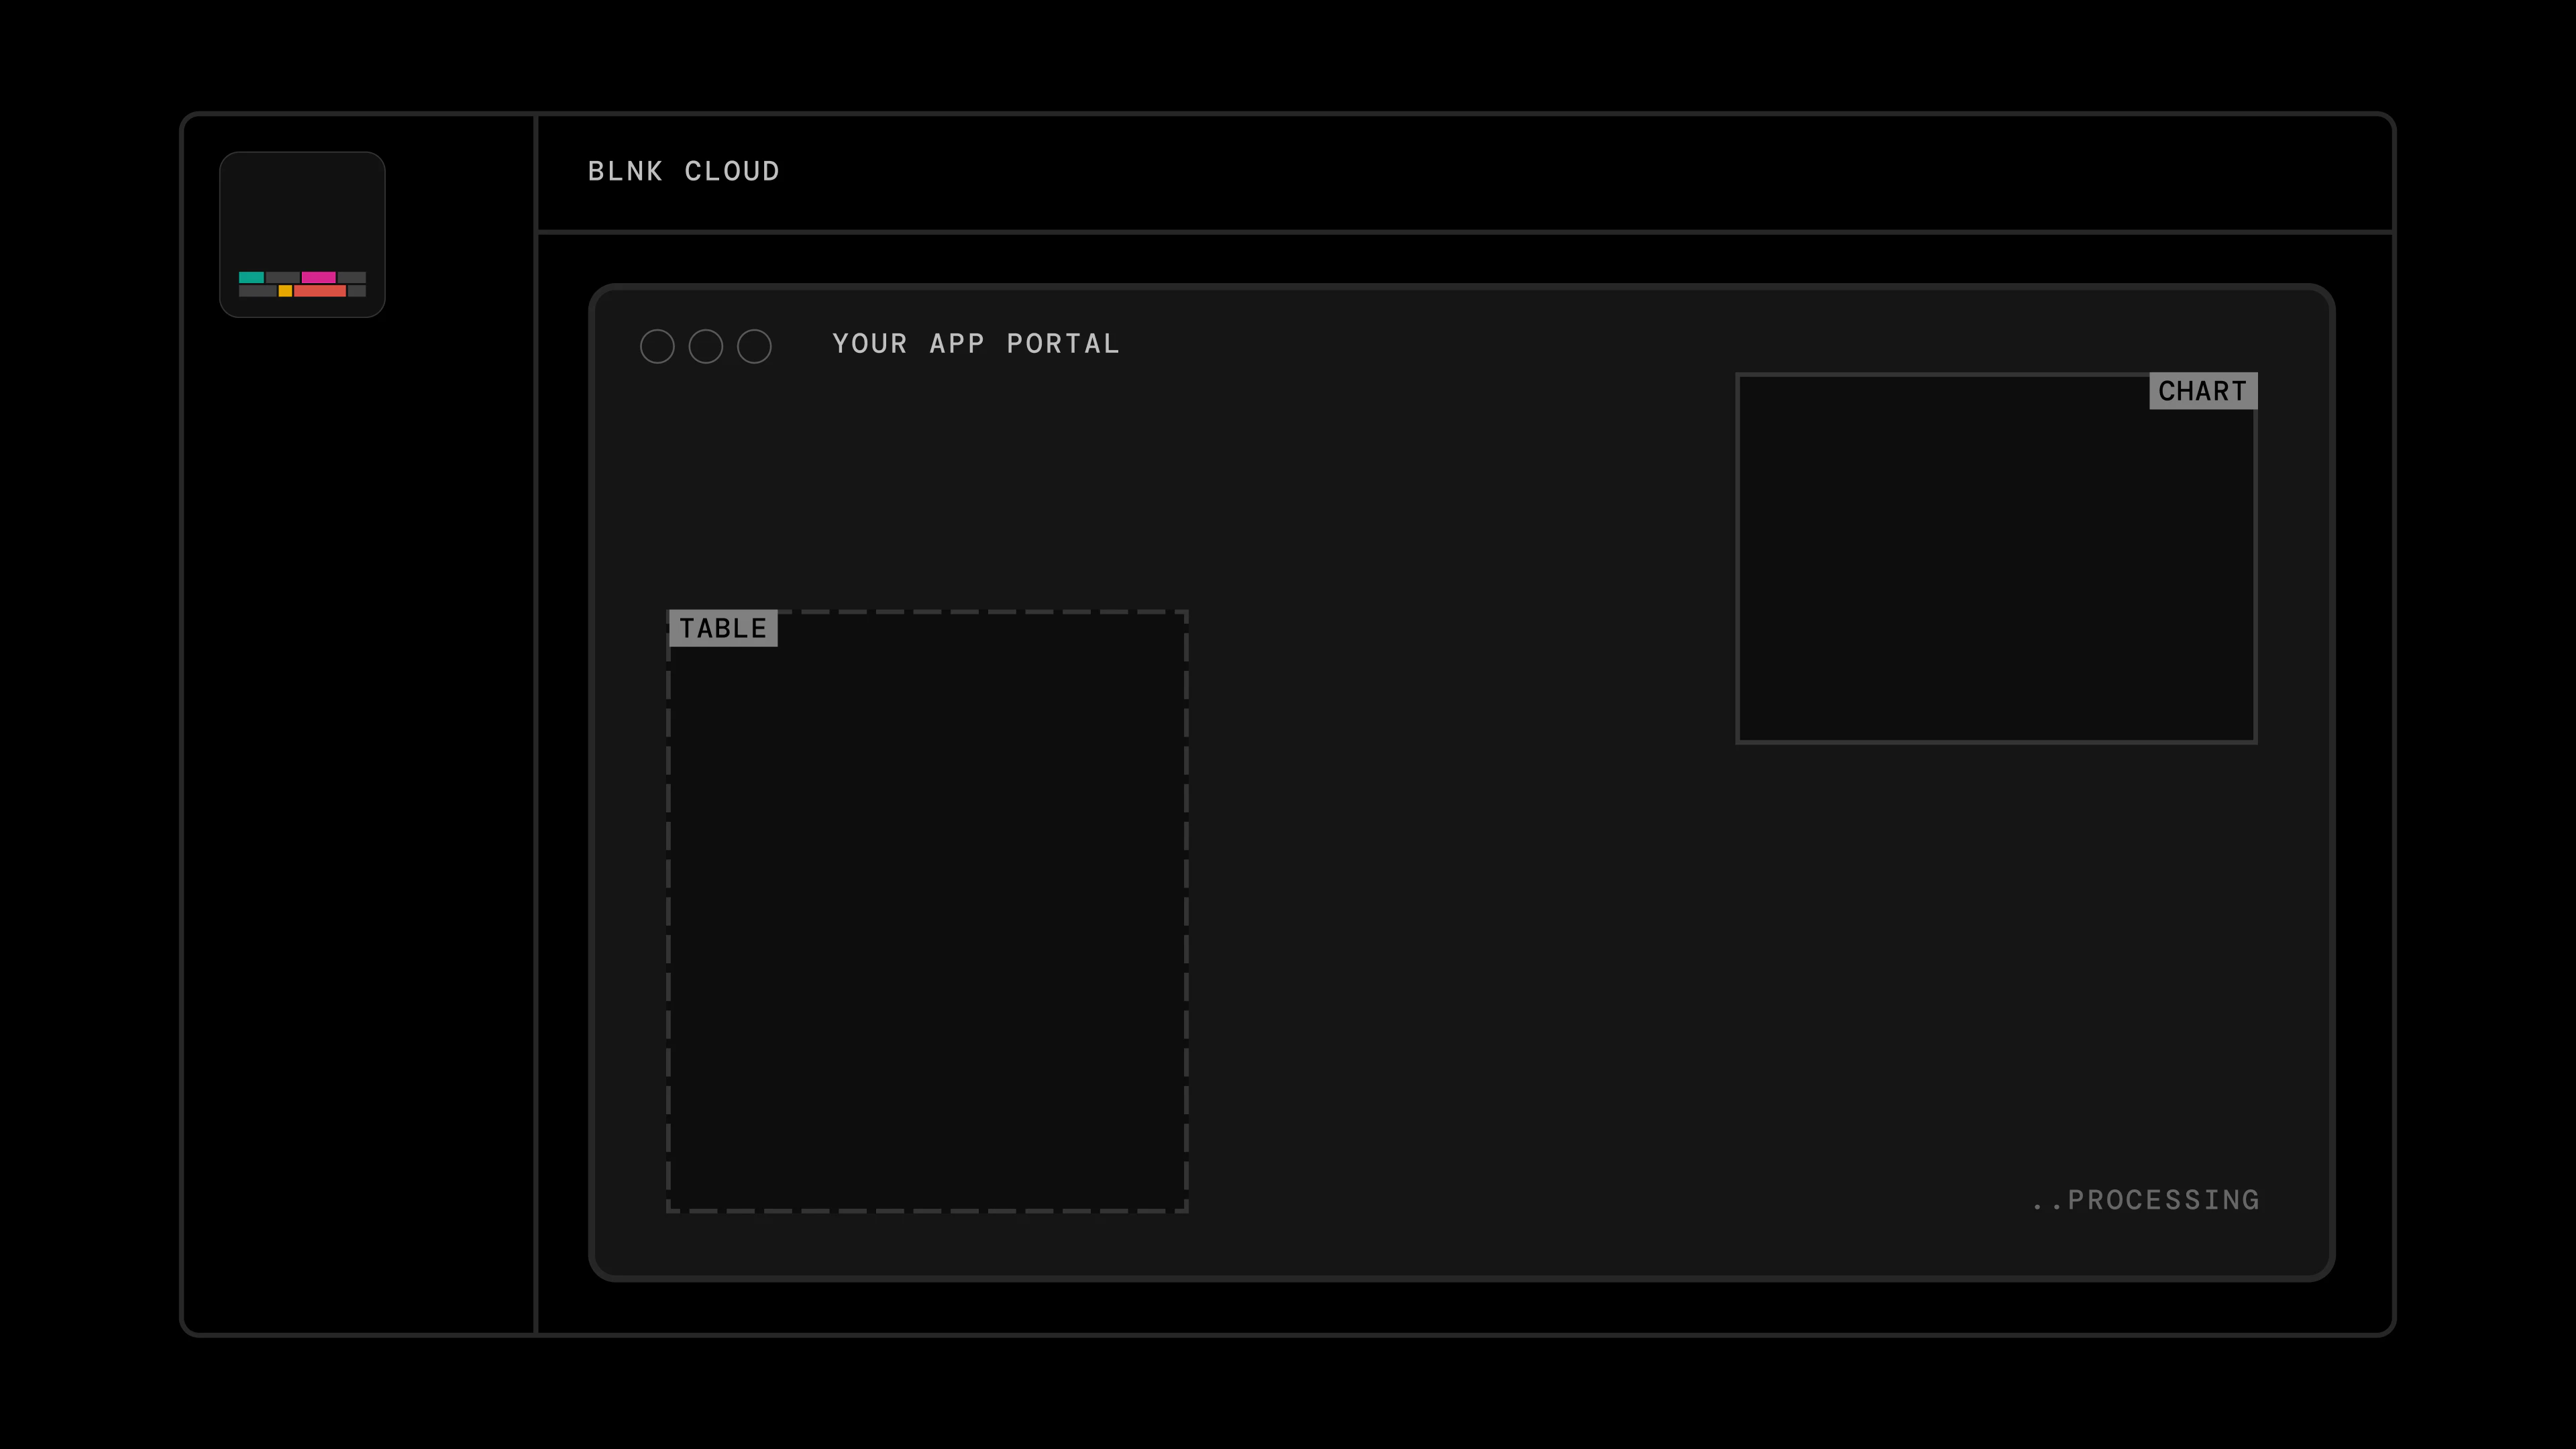 Your portal pages must allow Blnk to embed them in the dashboard. Set the `Content-Security-Policy` header described in [Best practices](/cloud/apps/best-practices#portal-and-dashboard-embedding).
A few rules to keep in mind during this process:
* Blnk sends a fresh portal request for every launch. Your app should return a fresh `portal_url` for each request.
* Keep Cloud API keys on the backend. Do not expose them in the browser.
***
## Test the launch flow
To test app launch:
1. Install the app in Cloud.
2. Click `Launch app` from the app details page.
3. If the app requires re-authentication, confirm with your password and 2FA code.
4. Confirm your `portal_generator_url` receives the launch request.
5. Confirm your app creates a portal session.
6. Confirm your app returns a valid `portal_url`.
7. Confirm the app opens inside the Cloud dashboard.
8. Confirm expired sessions can no longer open the portal.
Once this works, users can open your app from Blnk Cloud and work through the Stripe Sync workflow inside the dashboard.
***
## Troubleshooting
| Issue | What to do |
| -------------------------------------- | ---------------------------------------------------------------------------------------------------------- |
| Password or 2FA is incorrect at launch | Check your password or 2FA code and try again. You may see `Authentication failed`. |
| Portal does not open | Confirm your `portal_generator_url` is reachable and returns a valid `portal_url` within about 10 seconds. |
| App opens but session expires quickly | Launch the app again from Cloud to get a fresh portal session. |
***
Reference Stripe sync implementation.
***
We help you build custom apps for your use case or get help building your own from scratch.
Your portal pages must allow Blnk to embed them in the dashboard. Set the `Content-Security-Policy` header described in [Best practices](/cloud/apps/best-practices#portal-and-dashboard-embedding).
A few rules to keep in mind during this process:
* Blnk sends a fresh portal request for every launch. Your app should return a fresh `portal_url` for each request.
* Keep Cloud API keys on the backend. Do not expose them in the browser.
***
## Test the launch flow
To test app launch:
1. Install the app in Cloud.
2. Click `Launch app` from the app details page.
3. If the app requires re-authentication, confirm with your password and 2FA code.
4. Confirm your `portal_generator_url` receives the launch request.
5. Confirm your app creates a portal session.
6. Confirm your app returns a valid `portal_url`.
7. Confirm the app opens inside the Cloud dashboard.
8. Confirm expired sessions can no longer open the portal.
Once this works, users can open your app from Blnk Cloud and work through the Stripe Sync workflow inside the dashboard.
***
## Troubleshooting
| Issue | What to do |
| -------------------------------------- | ---------------------------------------------------------------------------------------------------------- |
| Password or 2FA is incorrect at launch | Check your password or 2FA code and try again. You may see `Authentication failed`. |
| Portal does not open | Confirm your `portal_generator_url` is reachable and returns a valid `portal_url` within about 10 seconds. |
| App opens but session expires quickly | Launch the app again from Cloud to get a fresh portal session. |
***
Reference Stripe sync implementation.
***
We help you build custom apps for your use case or get help building your own from scratch.